Tesla Model S: Module - Body Controller - BCM (Remove and Replace)
Tesla Model S (2012-2026) Service Manual / Electrical / Module - Body Controller - BCM (Remove and Replace)
Warning: If the 12V power supply is disconnected, do not attempt to open any doors with door glass in closed position. Failure to follow this instruction could result in door glass shatter.
Note: Before disconnecting the 12V power supply, ensure that the driver's door window is fully open. Failure to follow this instruction could result in vehicle lockout.
Removal
- Connect a laptop with Toolbox to the vehicle.
- In Toolbox, save the current hardware configuration:
- Select Views > Firmware and ECU Programming > Firmware Reflash. Note: Click the Question Mark icon for additional information.
- Click the Save button.
- Move the passenger seat fully rearward for access.
- Disconnect 12V power.
- Rear wheel drive (RWD): Refer to procedure.
- Dual Motor: Refer to procedure.
- Remove the RH center console closeout extension (refer to procedure).
- Remove the passenger side dash footwell closing trim (refer to procedure).
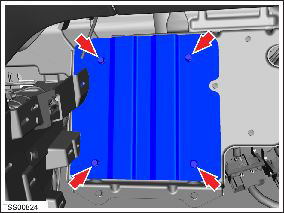
- Carefully peel back the carpet for access to the Body Control Module (BCM) cover. Caution: Take care not to damage component(s).
- Remove the bolts (x4) that secure the BCM cover to the mounting bracket (torque 5 Nm).
- Remove the BCM cover.
- Carefully release the BCM from the mount. Disconnect the harness
connectors (x8) and the optical connector.
Caution: Protect disconnected optical connectors from contamination and dirt ingress.
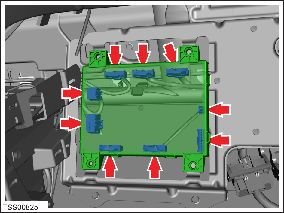
- Remove the BCM from the footwell.

Installation procedure is the reverse of removal, except for the following:
- Perform the VIN learn procedure:
- Connect a laptop with Toolbox 1.7 or later to the vehicle.
- In Toolbox, select Views > Firmware and ECU Programming > Body and Door Controller VIN Learn.
- Select BDY.
- Click the Start/Play button.
- Relearn all keys (refer to procedure).
- Use Toolbox to reset the immobilizer.
READ NEXT:
 Module - Body Controller - BCM (RHD) (Remove and Replace)
Removal
Remove the active suspension ECU (refer to procedure).
Remove the RH center console closeout extension (refer to
procedure).
Remove the RH footwell cover (refer to procedu
Module - Body Controller - BCM (Dual Motor) (RHD) (Remove and Replace)
Removal
Move both front seats to their rearmost positions.
Disconnect 12V power.
Rear wheel drive (RWD): Refer to
procedure.
Dual Motor: Refer to p
Module - Steering Column Control (Remove and Replace)
Removal
Ensure that the front road wheels are in the straight ahead
position.
Fully extend the column and centralize tilt.
Remove the steering wheel (refer to procedure).
Care
SEE MORE:
Cleaning Cameras and Sensors
To ensure the various Autopilot components can provide
information that is as accurate as possible, keep them
clean and free of obstructions, condensation, or damage
(see Cleaning).
Condensation can form inside the camera enclosures,
especially if you park your vehicle outside in cold or wet
c
Subframe Assembly - Rear (Remove and Replace)
Removal
Remove the rear drive unit:
Small drive unit:
Refer to procedure.
Large drive unit:
Refer to procedure.
Remove the rear sway bar
(refer to procedure).
If the vehicle is equipped with air suspension,
remove
© 2019-2026 Copyright www.tesms.org
