Tesla Model S: Module - Body Controller - BCM (RHD) (Remove and Replace)
Tesla Model S (2012-2026) Service Manual / Electrical / Module - Body Controller - BCM (RHD) (Remove and Replace)
Removal
- Remove the active suspension ECU (refer to procedure).
- Remove the RH center console closeout extension (refer to procedure).
- Remove the RH footwell cover (refer to procedure).
- Place a rag under the HVAC drain hose to catch any remaining fluid.
- Twist the hose to loosen and remove it from the nipple.
Note: The drain hose does not need to be removed from the vehicle.
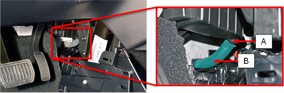
A HVAC nipple B HVAC hose - Remove the bolts (x2) that secure the Body Control Module (BCM) bracket to the body.
- Remove the BCM bracket and BCM as an assembly.
- Remove the bolts (x4) that secure the BCM to the BCM bracket.
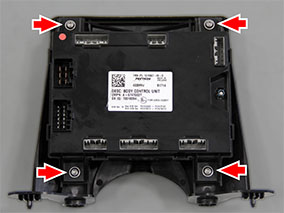
- Remove the BCM from the BCM bracket.
Installation procedure is the reverse of removal, except for the following:
- Use Toolbox to update or redeploy the firmware:
Note:
- If the vehicle is not running the latest firmware, run the "Vehicle Firmware Update" procedure.
- If the vehicle is running the latest firmware, run the "Firmware Redeploy" procedure.
- In the Toolbox "Pektron Body Controls Configuration" panel, select "Body Controller" and press the Play button.
- Relearn all keys (refer to procedure).
- Use Toolbox to reset the immobilizer.
READ NEXT:
 Module - Body Controller - BCM (Dual Motor) (RHD) (Remove and Replace)
Removal
Move both front seats to their rearmost positions.
Disconnect 12V power.
Rear wheel drive (RWD): Refer to
procedure.
Dual Motor: Refer to p
Module - Steering Column Control (Remove and Replace)
Removal
Ensure that the front road wheels are in the straight ahead
position.
Fully extend the column and centralize tilt.
Remove the steering wheel (refer to procedure).
Care
Module - Thermal Controller (Remove and Replace)
Removal
Remove IP carrier (refer to procedure)
Remove screws (x4) securing thermal control module to HVAC unit.
Position module for access and disconnect wiring harness
connec
SEE MORE:
Heater - PTC (Dual Motor) (Remove and Replace)
Warning: Only technicians who have been trained in High
Voltage Awareness are permitted to perform this procedure. Proper
personal protective equipment (PPE) and insulating HV gloves with a
minimum rating of class 00 (500V) must be worn any time a high
voltage cable is handled. Refer
Steering Interventions
Lane Assist provides steering interventions if Model S
drifts into (or close to) an adjacent lane in which an
object, such as a vehicle, is detected. In these situations,
Model S automatically steers to a safer position in the
driving lane. This steering is applied only when Model S
is travelin
© 2019-2026 Copyright www.tesms.org
