Tesla Model S: Module - HomeLink Transmitter (Remove and Replace)
Removal
- Remove the front fascia (refer to procedure).
- Disconnect the HomeLink transmitter module from the wiring harness.
- Release the clips (x2) that secure the HomeLink transmitter
module to the bracket.
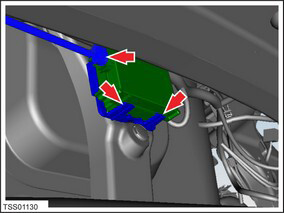
- Remove the HomeLink transmitter module.
Installation procedure is the reverse of removal.
When installing or replacing the HomeLink module in European-configured vehicles, it is necessary to encode the module with the appropriate country code. In the Toolbox "Homelink Program" panel, select "VehicleDefault" from the dropdown menu. Press the Start/Play button. After encoding the module, it is necessary to park the vehicle near the relevant door or gate and program the HomeLink module. Refer to the Owner's Manual for instructions.
Note: If the HomeLink module is replaced at the Service Center, instruct the customer to refer to the Owner's Manual for programming instructions.
READ NEXT:
 Sensor - Parking Distance - Front - Each (Remove and Replace)
Removal
Remove the front fascia assembly (refer to procedure).
Set the fascia assembly on a flat, clean surface.
Disconnect the parking distance sensor connector.
Sensor - Parking Distance - Rear - Each (Remove and Replace)
Removal
Remove the rear fascia assembly (refer to procedure).
Set the fascia assembly on a flat, clean surface.
Disconnect the parking distance sensor connector.
Sensor - Radar - Front (Remove and Replace)
Removal
Remove the front fascia (refer to procedure).
Remove the radar sensor gasket.
Note: The flaps on each side of the radar sensor
gasket are secured by double-sided
SEE MORE:
Auto Shift out of Park
NOTE: Auto Shift out of Park is a BETA feature and is
disabled by default.
When Auto Shift out of Park is enabled, Model S is
designed to use inputs from various sensors to
automatically select Drive or Reverse. The instrument
panel displays the selected drive mode when the driver's
door is clo
Dimensions
Exterior Dimensions
CAUTION: Depending on configuration (such as suspension height or
wheel selection), your vehicle's liftgate
can open up to approximately 7.5 feet (2.3 meters) high. See Adjusting
Liftgate Opening Height to
adjust the liftgate height and prevent it from coming into con
