Tesla Model S: Module - TPMS - Baolong (Remove and Replace)
Warning: If the vehicle has air suspension, activate "Jack" mode on the touchscreen before raising and supporting the vehicle.
Removal
- Raise and support the vehicle (refer to procedure). Warning: Do not work on an incorrectly supported vehicle. Warning: To avoid personal injury, use appropriate equipment when performing this operation.
- Remove the mid aero shield (refer to procedure).
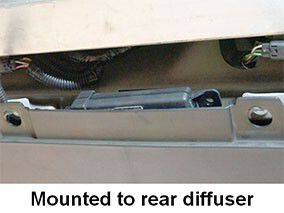
- Pull down the rear diffuser for access to the TPMS ECU.
- Disconnect the electrical harness connector.
- Remove the TPMS ECU.

Installation procedure is the reverse of removal, except for the following:
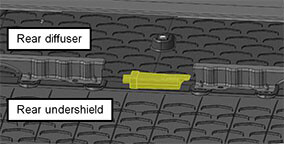
- Attach the new TPMS ECU to the top of the rear diffuser.
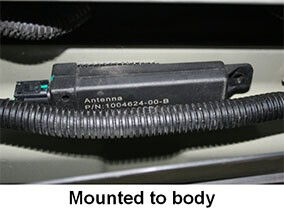
Note: Some vehicles had the TPMS ECU attached to the body. If the TPMS ECU was attached to the body, continue this procedure to install the new ECU on the diffuser. If the TPMS ECU was attached to the diffuser, skip to step 2.
- Clean the top surface of the ECU with alcohol.
- Cut a new pad of dual lock material that is the same size as
the original. Place it on the top of the ECU over the part
number, leaving the part revision visible.
- Clean the leading edge of the diffuser panel that faces up. Install a new pad of dual lock material that is the same size as the original, as close as possible to the edge of the diffuser panel.
- Attach the TPMS ECU as far forward as possible on the rear
diffuser panel.
- Perform the TPMS sensor ID learn procedure (refer to procedure).
- Set the proper TPMS thresholds (refer to procedure).
- Use Toolbox to update or redeploy the firmware:
Note:
- If the vehicle is not running the latest firmware, run the "Vehicle Firmware Update" procedure.
- If the vehicle is running the latest firmware, run the "Firmware Redeploy" procedure.
READ NEXT:
 Module - TPMS - Continental (Remove and Replace)
Removal
Remove RH rear seat bolster (refer to procedure).
Remove the 2nd row seat cushion (refer to procedure).
Release the lower section of the RH sill panel to access the
TPMS E
Module - HomeLink Transmitter (Remove and Replace)
Removal
Remove the front fascia (refer to procedure).
Disconnect the HomeLink transmitter module from the wiring
harness.
Release the clips (x2) that secure the HomeLink transmitt
Sensor - Parking Distance - Front - Each (Remove and Replace)
Removal
Remove the front fascia assembly (refer to procedure).
Set the fascia assembly on a flat, clean surface.
Disconnect the parking distance sensor connector.
SEE MORE:
Front Applique - 1st Generation (Remove and Replace)
Warning: To
avoid personal injury, wear cut-resistant gloves when performing
this operation.
Special tools required for this procedure:
Supplier
Part Number
Description
Operating Navigate on Autopilot
Once enabled, the Navigate on Autopilot button appears
on the map's turn-by-turn direction list whenever a
navigation route is active and the route includes at least
one controlled-access highway. When enabled, the
Navigate on Autopilot button is blue and the turn-by-
turn direction displays the
