Tesla Model S: Press Sensor - Door - Exterior Handle - Front - LH (Remove and Replace)
Tesla Model S (2012-2026) Service Manual / Closures / Press Sensor - Door - Exterior Handle - Front - LH (Remove and Replace)
Removal
- Remove door handle for access (refer to procedure)
- Position handle assembly on a soft working surface.
- Remove door handle rear seal.
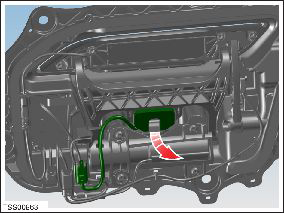
- Remove cable ties securing door pressure sensor and motor wiring.
- Release motor harness connector.
- Remove press sensor screw.
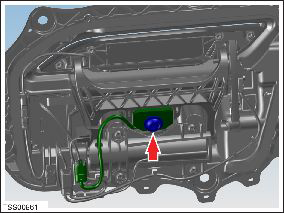
- Release door press sensor wiring connector.
- Using a suitable flat blade, release double sided tape and
remove the sensor from the fork.
- Installation procedure is the reverse of removal, except for the following.
- Clean mating face of fork
- Remove backing tape from sensor and attach to fork.
- Install door press sensor fixing screw engaging the first ten threads.
READ NEXT:
 Press Sensor - Door - Exterior Handle - Rear - LH (Remove and Replace)
Removal
Remove door handle for access (refer to procedure)
Position handle assembly on a soft working surface.
Remove door handle rear seal.
Remove cable ties securing door pressu
Position Sensor - Door - Exterior Handle - Front - LH (Remove and Replace)
Removal
Remove door handle for access (refer to procedure)
Remove door handle rear seal.
Remove control link pivot pin to allow control link to be
released from housing.
Posit
Position Sensor - Door - Exterior Handle - Rear - LH (Remove and Replace)
Removal
Remove door handle for access (refer to procedure)
Remove door handle rear seal.
Remove control link pivot pin to allow control link to be
released from housing.
SEE MORE:
Headlight - Adjust - North America
North America (SAE)
Prepare a work area for adjusting the headlights:
The area is darkened.
The ground is flat and level.
There is a wall with a white matte surface.
Note: The wall should be at least 6 ft (1.8 m)
high and 12 ft (3.7 m) wide.
Locking Devices
General
Always replace locking devices with ones of the same design.
Caution: Do not use impact tools on fasteners that are
threaded into aluminum components.
Locking tabs and washers
Always inspect locking tabs and washers. Do not reuse if damaged.
Pipe and hose unions
To preve
© 2019-2026 Copyright www.tesms.org
