Tesla Model S: Panel - A Pillar Trim - Middle - LH (Remove and Replace)
Tesla Model S (2012-2026) Service Manual / Instrument Panels and Pedals / Panel - A Pillar Trim - Middle - LH (Remove and Replace)
Removal
- Position vehicle with clear access to door assembly.
- Open vehicle door.
- Remove LH instrument panel side cover (refer to procedure)
- Release location pins (x2).
Caution: Take care not to damage component(s).
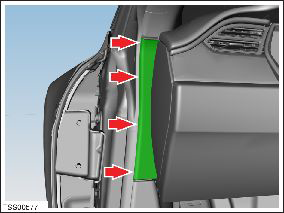
- Remove dash end trim.
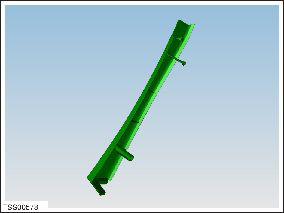
Installation procedure is the reverse of removal.
Assembly - Finisher - Instrument Panel - LH (Remove and Replace)
RemovalRemove driver side outer face level vent (refer to procedure) Installation Installation procedure is the reverse of removal.
READ NEXT:
 Assembly - Finisher - Instrument Panel - RH (Remove and Replace)
Removal
Remove the glove box assembly (refer to procedure).
In the upper area behind the glove box, remove the 2 screws
(torque 10 Nm) that secure the passenger airbag to the crossbar
Assembly - Mesh Grille - Defrost (Remove and Replace)
Removal
Remove the top pad for access to the mesh grille (refer to
procedure)
Remove the defrost mesh grille.
Installation
Installation procedure is the
Assembly - Top Pad - Instrument Panel (Remove and Install)
Warning: If the 12V power supply is disconnected, do
not attempt to open any doors with door glass in closed position.
Failure to follow this instruction could result in door glass
shat
SEE MORE:
Casing - Transmitter - Remote Keyless Entry (RKE)
Caution: Perform this procedure while using the proper anti-electrostatic
discharge equipment. Refer to TN-14-92-003, "Electrostatic Discharge
Tooling".
Removal
Remove the transmitter battery.
Hold the transmitter in one hand. Place the blade of a flat
screwdriver or si
Seat Belt Assembly - 3rd Row - LH (Remove and Replace)
Removal
Maneuver the 3rd row seat for access to the anchor points (x4).
Remove the bolts (x4) that secure the seat belt to the body and
seat back (torque 45 Nm).
Release and remove the seat belt buckle webbing from the main
assembly.
Release
© 2019-2026 Copyright www.tesms.org
