Tesla Model S: SD Card - Media Control Unit (Remove and Replace)
Tesla Model S (2012-2026) Service Manual / Infotainment / SD Card - Media Control Unit (Remove and Replace)
Note: This procedure only applies to MCU/touch screens that are revision E or later.
Removal
- Remove the MCU/touch screen (refer to procedure).
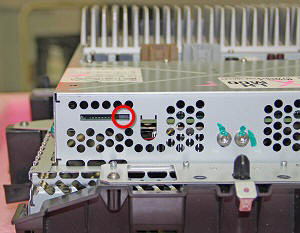
- Working from the top of the MCU/touch screen, carefully use a
plastic trim tool to press the SD card retaining tab away from the
socket. The SD card ejects from the socket.
Caution: Take care not to damage component(s).
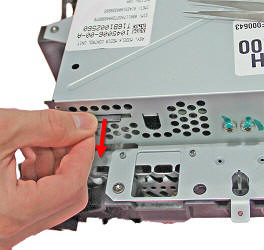
Note: The following image shows the SD card removed for clarity.
- Remove the SD card from the MCU/touchscreen.
Installation procedure is the reverse of removal, except for the following:
- Insert the SD card with the pins facing towards the touchscreen.
- Push the SD card into the socket until it snaps into place.
READ NEXT:
 Camera - Forward Facing (Remove and Replace)
Warning: If the 12V power supply is disconnected, do
not attempt to open any doors with door glass in closed position.
Failure to follow this instruction could result in door glass
shat
Camera - Rear Facing (Remove and Replace)
Removal
Remove the tailgate lower finisher (refer to procedure).
Pull back the watershield for access to the rear camera
electrical connector.
Drive Cycle Calibration - Forward Facing Camera
Note: If available, calibrate the forward facing camera using
the Camera Calibration Target (refer to procedure).
Note: This procedure describes how to perform a drive cycle
calibration on the
SEE MORE:
HV Junction Box - 1st Generation (Remove and Replace)
Warning: Only technicians who have been trained in High
Voltage Awareness are permitted to perform this procedure. Proper
personal protective equipment (PPE) and insulating HV gloves with a
minimum rating of class 00 (500V) must be worn any time a high
voltage cable is handled. Refer
Rear Reading Lights
Model S is equipped with a reading light on each side of
the rear seats, located above the door and next to the
coat hangers (see Coat Hangers ). To turn a
reading light on or off, press its lens. If you leave a
reading light turned on, it automatically turns off when
Model S powers off.
Headli
© 2019-2026 Copyright www.tesms.org
