Tesla Model S: Panel - Diffuser Tray - Rear (Remove and Replace)
Tesla Model S (2012-2026) Service Manual / Exterior fittings / Panel - Diffuser Tray - Rear (Remove and Replace)
Removal
- Remove rear fascia assembly (refer to procedure)
- Remove bolts (x6) and plastic rivets (x2) securing rear diffuser
to rear fascia and applique (torque 3 Nm).
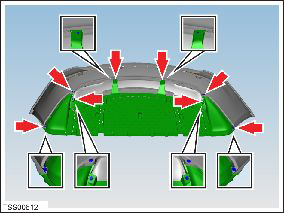
- Carefully release clips (x14) securing rear diffuser to rear
fascia, trim and applique.
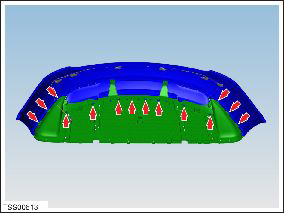
- Remove rear diffuser tray.
- Remove u-nuts (x6) from diffuser tray.
Installation procedure is the reverse of removal.
READ NEXT:
 Rails - Diffuser Tray Rear - LH (Remove and Replace)
Warning: If the vehicle has air suspension, activate "Jack"
mode on the touchscreen before raising and supporting the vehicle.
Removal
Raise and support the vehicle (refer to pro
Rear Lettering (Remove and Replace)
Special tool(s) required for this procedure:
Supplier
Part Number
Template color
Description
Applique - Liftgate (Remove and Replace)
Special tool required for this procedure:
Supplier
Part Number
Description
Tesla
1049517-0
SEE MORE:
HV Junction Box - Cover - 1st Generation (Remove and Replace)
Warning: Only technicians who have been trained in High
Voltage Awareness are permitted to perform this procedure. Proper
personal protective equipment (PPE) and insulating HV gloves with a
minimum rating of class 00 (500V) must be worn any time a high
voltage cable is handled. Refer
Liftgate Glass (Install)
Installation
Use the adhesive scraper to remove the excess urethane from the
liftgate glass and body.
Temporarily reconnect the CHMSL to the harness in the center of
the liftgate and have an assistant depress the brake pedal. Ensure
that the CHMSL lights up properly. If any
© 2019-2026 Copyright www.tesms.org
