Tesla Model S: Panel - Door Trim - LH - Rear (Remove and Replace)
Tesla Model S (2012-2026) Service Manual / Interior trim / Panel - Door Trim - LH - Rear (Remove and Replace)
Removal
- Remove the rear window lift switch (refer to procedure).
- Release the clips (x4) that secure the speaker cover to the door
trim.
Caution: Take care not to damage component(s).
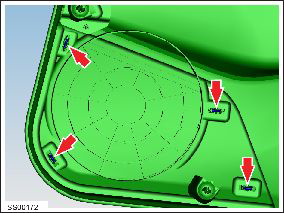
- Carefully remove the speaker cover.
- Remove and discard the heart flex clips (x9) from the trim panel.
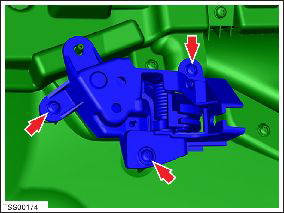
- Remove the screws (x3) that secure the door release lever to the door trim (torque 2 Nm).
- Remove the door release handle assembly from the door trim.
- Release the clips and remove the puddle lamp holder.
- Release the clips and remove the safety lamp holder from the door trim.
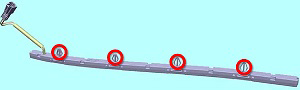
- If equipped, disconnect the indirect lighting harness and
release the clips (x4) that secure the indirect lighting bar. Remove
the indirect lighting bar and set aside.
- If the old door trim panel was equipped with indirect lighting,
perform the following on the new door trim panel:
- Use a razor to cut along the bottom of the leather wrap on
the panel insert.
Note: Components have been removed in this graphic to aid clarity.
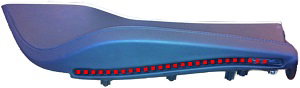
- Insert the indirect lighting harness through the opening.
- Insert the indirect lighting bar so that the clips (x4) are
fully secure.
Note: Components have been removed in this graphic to aid clarity.
- Connect the indirect lighting connector.
- Use a razor to cut along the bottom of the leather wrap on
the panel insert.
- Replace all heart flex clips (x9) that secure the trim panel.
Caution: Do not reuse the heart flex clips; they are one-time use only.
READ NEXT:
 Trim - Sill Panel - LH (Remove and Replace)
Removal
Remove the LH middle 'A' pillar trim panel (refer to procedure).
Use a trim tool to release the 2nd clip from the rear.
Caution: To avoid damaging the sill panel,
Trim - 'A' Post - LH (Remove and Install)
Removal
Remove the A-Pillar middle trim panels (refer to procedure)
Release 'A' post trim retaining screw cover, lower edge first.
Remove screw (x1) securing trim to 'A' post
Trim - 'A' Post - LH (Remove and Replace)
Removal
Remove 'A' post trim (refer to procedure)
Release clips (x3) securing tweeter to ' A' post trim.
Remove tweeter
SEE MORE:
Cannot charge - Poor grid power quality possible
Retry / Try other charge location or Supercharging
Charging has stopped due to a condition that prevents your vehicle from
charging with AC power. DC fast charging /
Supercharging should still function as expected.
This condition could occur due to power supply disturbances caused by the
externa
Charge Port - 3 Phase (Remove and Replace)
Note: This procedure describes how to remove and install
the 3 phase charge port. If the vehicle is equipped with a single
phase charge port, refer to procedure 44012202 (refer to procedure).
Warning: Only technicians who have been trained in High
Voltage Awareness are permitted to p
© 2019-2026 Copyright www.tesms.org
