Tesla Model S: Trim - Sill Panel - LH (Remove and Replace)
Tesla Model S (2012-2026) Service Manual / Interior trim / Trim - Sill Panel - LH (Remove and Replace)
Removal
- Remove the LH middle 'A' pillar trim panel (refer to procedure).
- Use a trim tool to release the 2nd clip from the rear.
Caution: To avoid damaging the sill panel, do not attempt to pry it up from the rear before releasing this clip.

- Release the remaining clips.
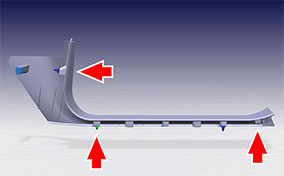
Note: The number of clips varies depending on the build date of the vehicle.
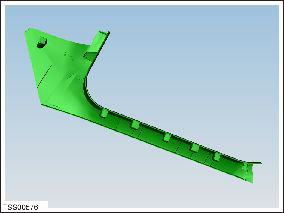
- Remove the trim panel.
Installation procedure is the reverse of removal, except for the following:
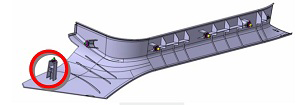
- Replace all broken trim clips except for the clip on the
tower.
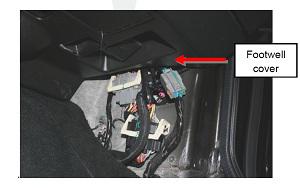
- When reinstalling the RH sill trim panel, position the front
of the trim panel between the footwell cover and the A-pillar,
then twist the trim panel to secure the bottom and rear trim
clips.
Caution: Do not damage any harness connections.
READ NEXT:
 Trim - 'A' Post - LH (Remove and Install)
Removal
Remove the A-Pillar middle trim panels (refer to procedure)
Release 'A' post trim retaining screw cover, lower edge first.
Remove screw (x1) securing trim to 'A' post
Trim - 'A' Post - LH (Remove and Replace)
Removal
Remove 'A' post trim (refer to procedure)
Release clips (x3) securing tweeter to ' A' post trim.
Remove tweeter
Trim - 'B' Post - Upper - LH (Remove and Install)
Removal
Remove the LH lower 'B' post trim (refer to procedure).
Carefully release the clips (x4) that secure the 'B' post upper
trim to the body by gently pulling the lower edge away
SEE MORE:
Condenser - Gas Cool (Remove and Replace)
Removal
Recover refrigerant from the vehicle (refer to procedure)
Remove front aero shield panel (refer to procedure)
Remove front LH wheel arch liner (refer to procedure)
Remove bolts (x2) securing front bumper panel support bar and
remove (torque 11 Nm).
Overview of Climate Controls
Climate controls are available at the bottom of the touchscreen. By default,
climate control is set to Auto, which
maintains optimum comfort in all but the most severe weather conditions. When
you adjust the cabin temperature
while in the Auto setting, the system automatically adjusts the heatin
© 2019-2026 Copyright www.tesms.org
