Tesla Model S: Pipe - High Pressure - Charge Port (Remove and Replace)
Tesla Model S (2012-2026) Service Manual / Thermal Management / Pipe - High Pressure - Charge Port (Remove and Replace)
Removal
- Recover refrigerant from the vehicle (refer to procedure)
- Remove underhood storage unit (refer to procedure)
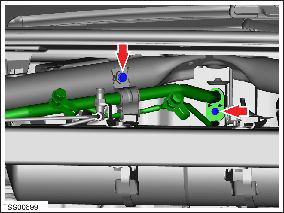
- Remove nut securing pipe retaining plate to evaporator TXV (torque 22 Nm).
- Remove bolt securing A/C pipe bracket to cross-brace (torque 6
Nm).

- Release high pressure charge port pipe from bracket.
- Remove bolt securing high pressure charge port pipe at union to high pressure condenser / chiller pipe (torque 8 Nm). Caution: Plug pipe connections to prevent ingress of moisture or dirt. Caution: Remove and discard O-rings.
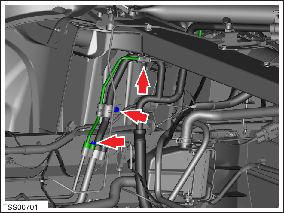
- Remove bolts (x2) securing A/C pipe brackets to crossmember and
RH shock tower (torque 6 Nm).

- Release high pressure charge port pipe from brackets (x2).
- Maneuver and remove pipe.
Installation procedure is the reverse of removal, except for the following:
Caution: Lubricate new O-rings with clean refrigerant oil.
READ NEXT:
 Pipe - High Pressure - Compressor to Condenser (Remove and Replace)
Removal
Recover refrigerant from the vehicle (refer to procedure).
Remove the underhood storage unit (refer to procedure).
Remove the bolt that secures the high pressure pipe to the
 Pipe - High Pressure - Compressor to Condenser (Dual Motor) (Remove and
Replace)
Removal
Position the vehicle on a lift, but do not raise it at this
time.
Recover refrigerant from the vehicle (refer to procedure).
Remove the 12V battery (refer to procedure).
 Pipe - Low Pressure - Charge Port (Remove and Replace)
Removal
Recover refrigerant from the vehicle (refer to procedure).
Remove the underhood storage unit (refer to procedure).
Disconnect the low pressure temperature transducer connector
SEE MORE:
 Vacuum Pump (Remove and Replace)
Warning: If the vehicle
has air suspension, activate "Jack" mode on the touchscreen before
raising and supporting the vehicle.
Removal
Remove the underhood storage unit
(refer to procedure).
Release the locking ring that secures the
vacuum hose to the pum
 Linking a Driver Profile to a Key
You can link a driver profile to a key (or keys) to allow
Model S to automatically select the correct driver profile
when the linked key is detected as you approach the
vehicle and open the driver's door. To link a driver profile
to a key, first ensure you are using your desired driver
profile.
© 2019-2026 Copyright www.tesms.org

