Tesla Model S: Pipe - High Pressure - Sub-Cool Condenser to Chiller (Remove and Replace)
Tesla Model S (2012-2026) Service Manual / Thermal Management / Pipe - High Pressure - Sub-Cool Condenser to Chiller (Remove and Replace)
Removal
- Recover refrigerant from the vehicle (refer to procedure)
- Remove front skid plate (refer to procedure)
- Remove nut (x1) securing pipe to sub-cool condenser (torque 8 Nm).
- Remove nut (x1) securing pipe retaining plate to TXV (torque 12
Nm).
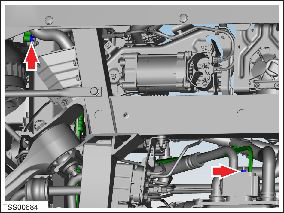
- Disconnect refrigerant pipes from TXV. Caution: Plug pipe connections to prevent ingress of moisture or dirt. Caution: Remove and discard O-rings.
- Remove underhood storage unit for access (refer to procedure)
- Remove bolt securing sub-cool condenser / chiller high pressure
pipe at union to high pressure charge port pipe (torque 8 Nm).
Caution: Plug pipe connections to prevent ingress of moisture or dirt. Caution: Remove and discard O-rings.
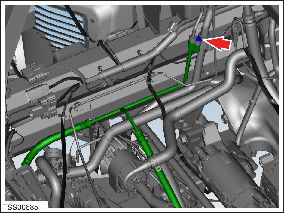
- Maneuver and remove pipe.
- Installation procedure is the reverse of removal, except for the following:
- Replace A/C pipe O-rings.
Caution: Lubricate new O-rings with clean refrigerant oil.
READ NEXT:
 Pipe - High Pressure - Charge Port (Remove and Replace)
Removal
Recover refrigerant from the vehicle (refer to procedure)
Remove underhood storage unit (refer to procedure)
Remove nut securing pipe retaining plate to evaporator TXV
(to
Pipe - High Pressure - Compressor to Condenser (Remove and Replace)
Removal
Recover refrigerant from the vehicle (refer to procedure).
Remove the underhood storage unit (refer to procedure).
Remove the bolt that secures the high pressure pipe to the
Pipe - High Pressure - Compressor to Condenser (Dual Motor) (Remove and
Replace)
Removal
Position the vehicle on a lift, but do not raise it at this
time.
Recover refrigerant from the vehicle (refer to procedure).
Remove the 12V battery (refer to procedure).
SEE MORE:
HV Harness - Front Drive Unit to HVJB
Warning: Only technicians who have been trained in High
Voltage Awareness are permitted to perform this procedure. Proper
personal protective equipment (PPE) and insulating HV gloves with a
minimum rating of class 00 (500V) must be worn any time a high
voltage cable is handled. Refer
Navigate on Autopilot
NOTE: Depending on market region, vehicle
configuration, options purchased, and software version,
your vehicle may not be equipped with Navigate on
Autopilot, or the feature may not operate exactly as
described.
NOTE: Navigate on Autopilot is a BETA feature.
When using Autosteer on a controlled-
© 2019-2026 Copyright www.tesms.org
