Tesla Model S: Pipe - High Pressure - Gas Cool to Sub-Cool Condenser (Remove and Replace)
Tesla Model S (2012-2026) Service Manual / Thermal Management / Pipe - High Pressure - Gas Cool to Sub-Cool Condenser (Remove and Replace)
Removal
- Recover refrigerant from the vehicle (refer to procedure)
- Remove front aero shield panel (refer to procedure)
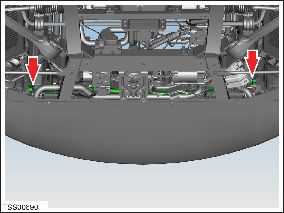
- Remove nuts (x2) securing inboard air conditioning link pipe to
gas cool and sub-cool condenser's (torque 8 Nm).
- Remove underhood storage unit for access (refer to procedure)
- Remove bolt securing inboard air conditioning link pipe to
carrier (torque 11 Nm).

- Maneuver and remove pipe.
Caution: Remove and discard O-rings.
Installation- Installation procedure is the reverse of removal, except for the following:
- Replace A/C pipe O-rings.
Caution: Lubricate new O-rings with clean refrigerant oil.
READ NEXT:
 Pipe - Low Pressure - Chiller (Remove and Replace)
Removal
Recover refrigerant from the vehicle (refer to procedure)
Remove front skid plate (refer to procedure)
Remove nut (x1) securing pipe retaining plate to chiller TXV
(torque
TXV Valve - Evaporator (Remove and Replace)
Removal
Recover refrigerant from the vehicle (refer to procedure)
Remove underhood storage unit (refer to procedure)
Remove nut securing pipe retaining plate to evaporator TXV
(to
TXV Valve - Chiller (Remove and Replace)
Removal
Recover refrigerant from the vehicle (refer to procedure).
Remove the front skid plate (refer to procedure).
Remove the nut that secures the pipe retaining plate to the TXV
SEE MORE:
Seal - Door Rear Outer Belt - LH (Remove and Replace)
Removal
Lower window glass.
Using a suitable tool release outer belt seal, release leading
edge and work rearward.
Caution: Protect paintwork from possible damage during
this procedure.
Caution: Take care not to damage component(s).
USB Drive Requirements for
Recording Videos
NOTE: For saving Sentry Mode and Dashcam footage,
Tesla recommends using the USB port located in the
glovebox. Doing so increases security and minimizes
power consumption.
One or more features on your Model S requires the use
of a flash drive (for example, Dashcam, Sentry Mode and
Track Mode (i
© 2019-2026 Copyright www.tesms.org
