Tesla Model S: Pipe - Low Pressure - Chiller (Remove and Replace)
Tesla Model S (2012-2026) Service Manual / Thermal Management / Pipe - Low Pressure - Chiller (Remove and Replace)
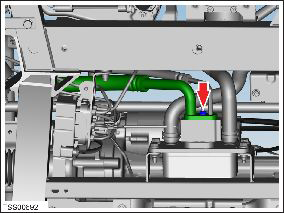
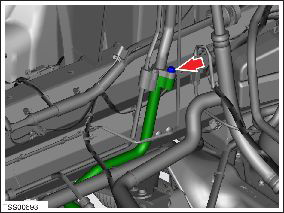
Removal
- Recover refrigerant from the vehicle (refer to procedure)
- Remove front skid plate (refer to procedure)
- Remove nut (x1) securing pipe retaining plate to chiller TXV
(torque 12 Nm).
- Disconnect refrigerant pipes from TXV. Caution: Plug pipe connections to prevent ingress of moisture or dirt. Caution: Remove and discard O-rings.
- Remove underhood storage unit (refer to procedure)
- Remove bolt securing chiller low pressure pipe at union to low
pressure charge port pipe (torque 8 Nm).
- Maneuver and remove pipe.
Caution: Plug pipe connections to prevent ingress of moisture or dirt.
Caution: Remove and discard O-rings.
Installation- Installation procedure is the reverse of removal, except for the following:
- Replace A/C pipe O-rings.
Caution: Lubricate new O-rings with clean refrigerant oil.
READ NEXT:
 TXV Valve - Evaporator (Remove and Replace)
Removal
Recover refrigerant from the vehicle (refer to procedure)
Remove underhood storage unit (refer to procedure)
Remove nut securing pipe retaining plate to evaporator TXV
(to
TXV Valve - Chiller (Remove and Replace)
Removal
Recover refrigerant from the vehicle (refer to procedure).
Remove the front skid plate (refer to procedure).
Remove the nut that secures the pipe retaining plate to the TXV
Pressure Transducer - Low Pressure (Remove and Replace)
Removal
Recover refrigerant from the vehicle (refer to procedure).
Remove the underhood storage unit (refer to procedure).
Disconnect the electrical connector from the pressure
tr
SEE MORE:
Right Scroll Button
Use the scroll button on the right side of the steering
yoke to control Autopilot features such as Autosteer and
Traffic-Aware Cruise Control:
When driving, push and release the button to engage
Autosteer or Traffic-Aware Cruise Control (see
Autosteer). If Autosteer Activation is
set to D
Smart Summon
NOTE: Depending on market region, vehicle
configuration, options purchased, and software version,
your vehicle may not be equipped with Smart Summon,
or the feature may not operate exactly as described.
Smart Summon is designed to allow you to move
Model S to your location (using your phone's GP
© 2019-2026 Copyright www.tesms.org
