Tesla Model S: Seat Belt Assembly - 1st Row - LH (Remove and Replace)
Warning: If the 12V power supply is disconnected, do not attempt to open any doors with door glass in closed position. Failure to follow this instruction could result in door glass shatter.
Note: Before disconnecting the 12V power supply, ensure that the driver's door window is fully open. Failure to follow this instruction could result in vehicle lockout.
Removal
- Disconnect 12V power.
- Rear wheel drive (RWD): Refer to procedure.
- Dual Motor: Refer to procedure.
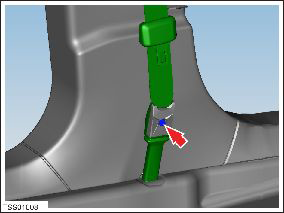
- Remove the plastic grommet that covers the seat belt fastener to
the pre-tensioner.
Note: The driver's seat has been removed from the graphic for clarity.

- Remove the bolt that secures the seat belt to the pre-tensioner
(torque 9 Nm).
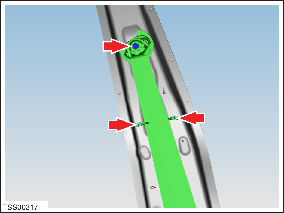
- Remove the 'B' post upper trim (refer to procedure).
- Remove the screws (x2) that secure the seat belt guide to the
body and remove the guide (torque 5 Nm).
- Remove the bolt that secures the seat belt D-ring to the body (torque 25 Nm).
- Peel the carpet aside for access to the reel assembly.
- Disconnect the seat belt reel connector and position the harness
aside.
Note: The pre-tensioner has been removed from the graphic for clarity.
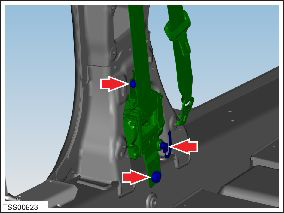
- Remove the upper bolt that secures the seat belt reel to the body (torque 20 Nm).
- Remove the lower bolt that secures the seat belt reel to the body (torque 40 Nm).
- Remove the seat belt reel assembly.
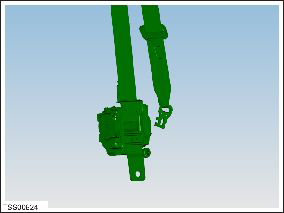
Installation procedure is the reverse of removal.
READ NEXT:
 Buckle Assembly - 1st Row - LH (Remove and Replace)
Removal
Open door.
Power seat adjust rearwards and upwards for access.
Remove screw securing inner cover to seat.
C
Seat Belt Assembly - 2nd Row - LH (Remove and Replace)
Warning: If the 12V power supply is disconnected, do
not attempt to open any doors with door glass in closed
position. Failure to follow this instruction could result in
door glass shat
Buckle Assembly - 2nd Row - LH (Remove and Replace)
Warning: Prior to disconnection of 12 volt power supply,
ensure driver's door glass is in the fully open position. Failure to
follow this instruction could result in vehicle lockout.
Warni
SEE MORE:
Starting
When you open a door to enter Model S, the instrument
panel and touchscreen power on and you can operate all
controls. To shift Model S, press the brake pedal and
swipe up for Drive or down for Reverse on the
touchscreen's drive mode strip (see Shifting).
If Auto Shift out of Park is enabled, M
Cabin Air Filter(s)
Model S has one or more air filters to prevent pollen,
industrial fallout, road dust and other particles from
entering through the vents.
NOTE: Cabin air filter(s) require periodic replacement.
See Service Intervals.
Cabin Overheat Protection
The climate control system can reduce the temperature
