Tesla Model S: Panel - Cowl Screen (Remove and Replace)
Tesla Model S (2012-2026) Service Manual / Exterior fittings / Panel - Cowl Screen (Remove and Replace)
Removal
- Remove the wiper arms (refer to procedure).
- Remove the particulate filter (refer to procedure).
- Remove the plastic rivets (x4 or x6) that secure the cowl to the
body.
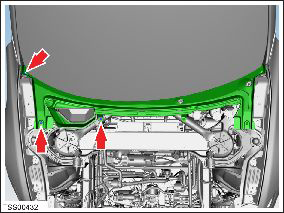
- Remove the plastic rivets that secure the front LH shock tower
cover to the body. Pull back the cover for access, then release the
forward edge of the cowl screen panel.
- Repeat the previous step on the RH shock tower cover.
- Remove the cowl screen panel.
Note: The rubber washers that are located between the wiper spindles and the cowl screen panel can stick to the panel as it is removed, then fall off the panel without being noticed. Collect the washers as the panel is removed and reinstall them on the wiper spindles.
InstallationInstallation procedure is the reverse of removal.
READ NEXT:
 Assembly - Underhood Apron - Front (Remove and Replace)
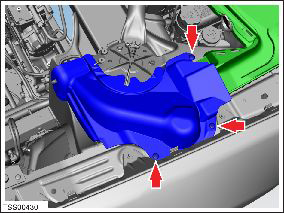
Removal
Remove the LH underhood apron (refer to procedure).
Remove the RH underhood apron.
Remove the retainers (x2) that secure the underhood apron.
Carefully release the clips (
Underhood Apron - Center - Rear (Remove and Replace)
Removal
Remove the LH underhood apron (refer to procedure).
Remove the RH underhood apron.
Release the clips (x5) that secure the rear center underhood
apron to the plenum.
Underhood Apron - LH (Remove and Replace)
Removal
Open the hood.
Release the lugs (x3) that secure the LH underhood apron to the
inner fender.
Caution: Take care not to damage component(s).
SEE MORE:
Rear Park Brake Caliper Release
Caution: This method
requires replacing the caliper. To release a stuck caliper without
damaging it, refer to either:
Park Brake Caliper - Release - Harness Tool - Through Calipers
Park Brake Caliper - Release - Harness Tool - Through ECU
Release
Cabin Air Filter(s)
Model S has one or more air filters to prevent pollen,
industrial fallout, road dust and other particles from
entering through the vents.
NOTE: Cabin air filter(s) require periodic replacement.
See Service Intervals.
Cabin Overheat Protection
The climate control system can reduce the temperature
© 2019-2026 Copyright www.tesms.org
