Tesla Model S: Seat Assembly - 3rd Row (Remove)
Tesla Model S (2012-2026) Service Manual / Seats / Seat Assembly - 3rd Row (Remove and Replace) / Seat Assembly - 3rd Row (Remove)
Removal
- Open the liftgate.
- Fold down the third row seats.
Caution: Take care not to damage component(s). Caution: Protect the interior trim from possible damage.
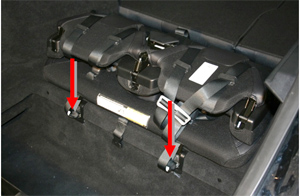
- Remove the bolts that secure the third row seatbelt straps
(torque 26 Nm). Remove the seatbelt straps.
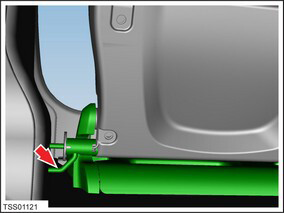
Note: The bolts screw into nut inserts that are
able to slide freely within the body panel. After removing
each seatbelt strap, place a wedge through the bolt hole so
that the nut inserts do not slide out of position. If they
do, refer to the installation instructions for how to
reposition them.
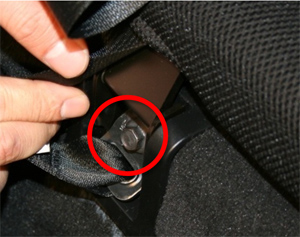
- Release the seat cushion catches on either side of the seat
assembly.
- With an assistant, remove the 3rd row seat from the vehicle.
READ NEXT:
 Seat Assembly - 3rd Row (Replace)
Installation
Installation procedure is the reverse of removal, except for the
following:
Before installing the mounting bolts, ensure that the
mounting bracket holes
Cover - Outer Side - Driver's Seat (Remove and Install)
Removal
Open both driver's side doors.
Power the seat height adjust fully upwards for access.
Remove the screw that secures the outer side cover to the seat
(torque 1 Nm).
SEE MORE:
Location of Airbags
Airbags are located in the approximate areas shown below. Airbag warning
information is printed on the sun visors.
Model S is equipped with an airbag and lap/shoulder belt at both front seating
positions. The airbag is a
supplemental restraint at those seating positions. All occupants, including
HV Junction Box - Reed Switch - 1st Generation (Remove and Replace)
Note: This procedure only applies to vehicles with the
1st generation High Voltage Junction Box.
Special tools required for this procedure:
Supplier
Part Number
Description
Bosch
© 2019-2026 Copyright www.tesms.org
