Tesla Model S: Replacing Cabin Air Filters
Model S has an air filter that prevents pollen, industrial fallout, road dust, and other particles from entering the cabin through the vents. Tesla recommends replacing these filters every 2 years (every year in China). Cabin filters can be purchased at the Tesla online store.
To replace the cabin filter:
1. Turn off the climate control system.
2. Move the front passenger seat fully rearwards.
3. Slowly and gently pull down the footwell cover to release the magnets, then disconnect the electrical harness on the right side of the cover. Set the footwell cover aside.
4. Squeeze the cabin filter door lock to release it, and then remove and set the door aside.
5. Note the direction of air flow printed on the cabin filter. The arrows on the filter should face toward the rear of the vehicle.
6. Slide the filter out of the HVAC module.
7. Ensuring that the arrows on the new filter face toward the rear of the vehicle, insert the new cabin filter into the HVAC module.
8. Slide the cabin filter door onto the HVAC module, and then push the door to lock it.
NOTE: Ensure the lock is fully engaged and the door is sealed shut.
9. Position the front passenger footwell cover on the vehicle and connect the electrical harness to the cover.
10. Install the front passenger footwell cover, making sure the magnets (x3) are locked into position.
11. Move the front passenger seat back to its original position.
Using RFID Transponders
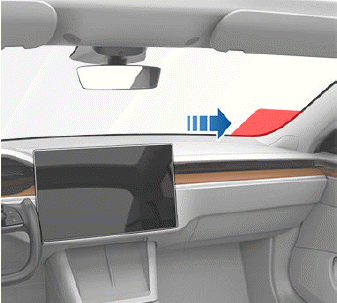
When attaching an RFID transponder (used by many automated toll systems) inside Model S, place the transponder on the bottom corner of the passenger side of the windshield as shown. This ensures best results and minimizes any obstruction to your driving view.
NOTE: You can also attach a weather-proof transponder to the front license plate.
READ NEXT:
 Identification Labels
Vehicle Identification Number
You can find the VIN at the following locations:
Touch Controls > Software.
Stamped on a plate located at the top of the
dashboard. Can be seen by looking through
SEE MORE:
How To Use This Manual
General
Caution: Only qualified technicians should attempt to perform
the procedures contained within this manual.
This manual is organized by vehicle subsystem. Click on a subsystem
in the lefthand menu see categories of repairs in that subsystem.
Each service procedure has a uniqu
Key Fob
You can quickly familiarize yourself with the key fob by
thinking of it as a miniature version of Model S, with the
Tesla badge representing the front. The key has buttons
that feel like softer areas on the surface.
Rear trunk - Double-click to open or close the rear
trunk. Hold down for one
