Tesla Model S: Reservoir - Air Suspension (Remove and Replace)
Tesla Model S (2012-2026) Service Manual / Suspension / Reservoir - Air Suspension (Remove and Replace)
Removal
- Raise and support the vehicle (refer to procedure).
- Depressurize air reservoir (refer to procedure).
- Remove underhood storage unit (refer to procedure).
- Disconnect 12V power (refer to procedure).
- Remove the air line.
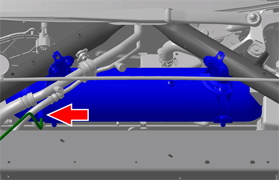
- For vehicles manufactured before November 2013: Release the
air line on the reservoir side of the fill valve.
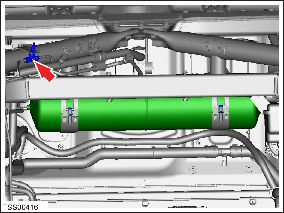
- For vehicles manufactured November 2013 and later: Unscrew
the main air line connector from the reservoir (torque 5 Nm).
- For vehicles manufactured before November 2013: Release the
air line on the reservoir side of the fill valve.
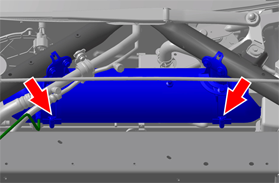
- Support the reservoir and remove the retaining screws (x2) on
the mounting straps.
- For vehicles manufactured before November 2013:
.png)
- For vehicles manufactured November 2013 and later:
- For vehicles manufactured before November 2013:
- Remove the reservoir.
Installation procedure is the reverse of removal, except for the following:
- Pressurize the air suspension (refer to procedure).
READ NEXT:
 Sensor - Ride Height - Front - LH (Remove and Replace)
Warning: If the vehicle has air suspension, activate "Jack"
mode on the touchscreen before raising and supporting the vehicle.
Removal
Position the vehicle on a lift, but do not
Sensor - Ride Height - Rear - LH (Remove and Replace)
Warning: If the vehicle has air suspension, activate "Jack"
mode on the touchscreen before raising and supporting the vehicle.
Removal
Remove the road wheel (refer to procedure).
Air Line - Air Suspension - Valve Block to LH Front Air Spring (Remove and
Replace)
Removal
Raise and support the vehicle (refer to procedure).
Depressure the air suspension system (refer to procedure).
In the front left wheel well, remove the front portion of the
l
SEE MORE:
Base Assembly - Front Passenger's Seat (Remove and Replace)
Removal
Remove the passenger's seat assembly (refer to procedure).
Place the seat on a clean work surface.
Remove the screws (x2) that secure the inner side cover to the
seat (torque 1 Nm).
Carefully release the inner side cover from the retaining
bracket.
Remove the
Wind Deflector (Remove and Replace)
Removal
Remove the LH and RH wind deflector arms
(refer to procedure).
Release the wind deflector from the clips on
the deflector blade.
Removal
Installation procedure is the reverse of removal.
Caution: Ensure that the
© 2019-2026 Copyright www.tesms.org
