Tesla Model S: Sensor - Ride Height - Front - LH (Remove and Replace)
Tesla Model S (2012-2026) Service Manual / Suspension / Sensor - Ride Height - Front - LH (Remove and Replace)
Warning: If the vehicle has air suspension, activate "Jack" mode on the touchscreen before raising and supporting the vehicle.
Removal
- Position the vehicle on a lift, but do not raise the vehicle at this time.
- Loosen the front LH lug nuts (torque 175 Nm).
- Remove the upper front LH arch liner (refer to procedure)
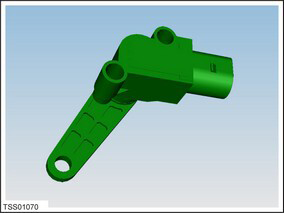
- Disconnect ride height sensor connector and harness.
- Remove the nut that secures the link to the upper suspension arm (torque 7 Nm). Caution: To prevent ball joint damage, always hold the ball joint pin with a wrench while loosening or tightening the lock nut.
- Remove the screws (x2) that secure the ride height sensor to the
body (torque 7 Nm).

- Remove ride height sensor.
- Installation procedure is the reverse of removal. Note: Clean the affected areas before installation. Caution: Replace all nylon-insert locknuts.
- Calibrate ride height sensors (refer to procedure)
READ NEXT:
 Sensor - Ride Height - Rear - LH (Remove and Replace)
Warning: If the vehicle has air suspension, activate "Jack"
mode on the touchscreen before raising and supporting the vehicle.
Removal
Remove the road wheel (refer to procedure).
Air Line - Air Suspension - Valve Block to LH Front Air Spring (Remove and
Replace)
Removal
Raise and support the vehicle (refer to procedure).
Depressure the air suspension system (refer to procedure).
In the front left wheel well, remove the front portion of the
l
Air Suspension - Primary Lines Assembly (Remove and Replace)
Warning: To avoid personal injury, eye protection must be
worn when performing this operation.Removal
Raise and support the vehicle (refer to procedure).
Depressure the air suspension
SEE MORE:
Factors Affecting Energy
Consumption
While driving:
Elevated driving speed.
Environmental conditions such as cold or hot weather
and wind.
Using climate controls to heat or cool the cabin.
Uphill travel: Driving uphill requires more energy and
depletes range at a faster rate. However, driving
downhill allows your vehicle to
Heater - PTC (Dual Motor) (Remove and Replace)
Warning: Only technicians who have been trained in High
Voltage Awareness are permitted to perform this procedure. Proper
personal protective equipment (PPE) and insulating HV gloves with a
minimum rating of class 00 (500V) must be worn any time a high
voltage cable is handled. Refer
© 2019-2026 Copyright www.tesms.org
