Tesla Model S: Sensor - Ride Height - Rear - LH (Remove and Replace)
Tesla Model S (2012-2026) Service Manual / Suspension / Sensor - Ride Height - Rear - LH (Remove and Replace)
Warning: If the vehicle has air suspension, activate "Jack" mode on the touchscreen before raising and supporting the vehicle. Removal
- Remove the road wheel (refer to procedure).
- Disconnect the ride height sensor connector and harness.
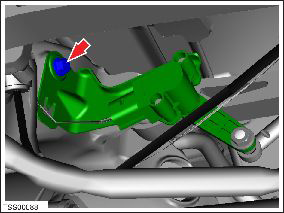
- Remove the nut that secures the link to the upper suspension link (torque 7 Nm). Caution: To prevent ball joint damage, always hold the ball joint pin with a wrench while loosening or tightening the lock nut.
- Remove the bolt that secures the ride height sensor to the body
(torque 7 Nm).

- Remove the ride height sensor from the vehicle.
- Installation procedure is the reverse of removal. Note: Clean the affected areas before installation. Caution: Replace all nylon-insert locknuts.
- Calibrate the ride height sensors (refer to procedure).
READ NEXT:
 Air Line - Air Suspension - Valve Block to LH Front Air Spring (Remove and
Replace)
Removal
Raise and support the vehicle (refer to procedure).
Depressure the air suspension system (refer to procedure).
In the front left wheel well, remove the front portion of the
l
 Air Suspension - Primary Lines Assembly (Remove and Replace)
Warning: To avoid personal injury, eye protection must be
worn when performing this operation.Removal
Raise and support the vehicle (refer to procedure).
Depressure the air suspension
 Air Line - Air Suspension - Reservoir to Compressor (Remove and Replace)
Removal
Raise and support the vehicle (refer to procedure).
Depressure the air suspension system (refer to procedure).
Disconnect 12V power.
Rear wheel drive (
SEE MORE:
 Footrest - Driver's (Remove and Replace)
Removal
Position driver's seat fully rearward for access.
Using a suitable trim tool release clips (x3) securing footrest
to mounting.
Remove footrest.
Installation
Installation procedu
 Door Glass - LH - Rear - Adjust
Removal
Remove door trim pad (refer to procedure)
Partially lower glass for access to glass clamp.
Remove water proof tape for access to adjustment clamp.
Loosen but do not remove clamp nut securing door glass to
regulator (torque 7.5 Nm). This allows glass to move fore and
© 2019-2026 Copyright www.tesms.org

