Tesla Model S: Air Line - Air Suspension - Valve Block to LH Front Air Spring (Remove and Replace)
Tesla Model S (2012-2026) Service Manual / Suspension / Air Line - Air Suspension - Valve Block to LH Front Air Spring (Remove and
Replace)
Removal
- Raise and support the vehicle (refer to procedure).
- Depressure the air suspension system (refer to procedure).
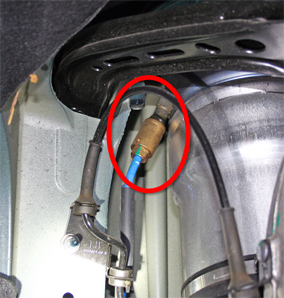
- In the front left wheel well, remove the front portion of the lower wheel arch liner (refer to procedure).
- Release the fitting from the front left air spring (torque 5
Nm).
Caution: Plug the line connection to prevent ingress of moisture or dirt.
- Release the air line clips (x2) on the wheel well.
- Remove the front aero shield (refer to procedure).
- Release the air line clips (x2) on the front trunk area.
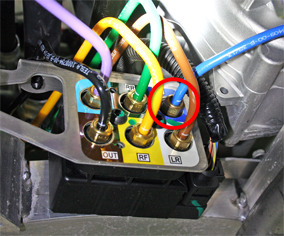
- Release the fitting from the valve block (torque 3.5 Nm).
Caution: Plug the line connection to prevent ingress of moisture or dirt.
Installation procedure is the reverse of removal, except for the following:
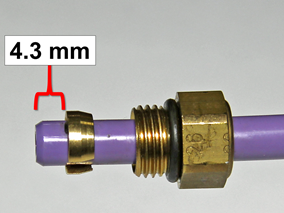
- Install new fittings into the air spring and valve block
before installing the air line.
Note: Ensure that the collet is 4.3 mm from the end of the air line to prevent air pressure restriction.
READ NEXT:
 Air Suspension - Primary Lines Assembly (Remove and Replace)
Warning: To avoid personal injury, eye protection must be
worn when performing this operation.Removal
Raise and support the vehicle (refer to procedure).
Depressure the air suspension
Air Line - Air Suspension - Reservoir to Compressor (Remove and Replace)
Removal
Raise and support the vehicle (refer to procedure).
Depressure the air suspension system (refer to procedure).
Disconnect 12V power.
Rear wheel drive (
Air Line - Air Suspension - Compressor to Valve Block (Remove and Replace)
Warning: To avoid personal injury, eye protection must be
worn when performing this operation.Removal
Raise and support the vehicle (refer to procedure).
Disconnect 12V power.
SEE MORE:
Camera Location
Model S is equipped with a rear view camera located
above the rear license plate.
Whenever you shift into Reverse, the touchscreen
displays the view from the camera. Lines show your
driving path based on the position of the steering yoke.
These lines adjust as you move the steering yoke.
Model
Seat Belt Assembly - 2nd Row - Center (Remove and Replace)
Removal
Remove the 2nd row seat cushion (refer to procedure)
Carefully release pegs (x2) securing seatbelt trim to seat back.
Release clips (x18) securing seat back cover. Remove for access
to middle seat belt.
© 2019-2026 Copyright www.tesms.org
