Tesla Model S: Right Scroll Button
Use the scroll button on the right side of the steering yoke to control Autopilot features such as Autosteer and Traffic-Aware Cruise Control:

- When driving, push and release the button to engage Autosteer or Traffic-Aware Cruise Control (see Autosteer). If Autosteer Activation is set to Double Click (touch Controls > Autopilot Activation > Autosteer Activation), a single push engages Traffic-Aware Cruise Control (see Traffic- Aware Cruise Control) only and you must push and release twice to engage Autosteer. Once engaged, pushing the button cancels Autosteer and/or Traffic-Aware Cruise Control.
- When Model S is in Park, push the button twice to automatically engage Summon (if equipped) before exiting the vehicle (see Starting Summon Before Exiting the Vehicle).
- When Traffic-Aware Cruise Control is engaged, rolling the scroll button up/down increase/decreases the set cruising speed respectively.
NOTE: There is currently no action associated with pushing the right scroll button to the left and right.
Heated Steering Yoke
To warm up the steering yoke, touch the temperature icon on the touchscreen to display climate controls (see Overview of Climate Controls), then touch the steering yoke icon. When turned on, radiant heat keeps the steering yoke at a comfortable temperature.
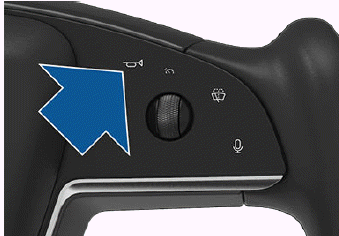
Horn
To sound the horn, press and hold the horn button on the right side of the steering yoke.
READ NEXT:
 Adjusting Exterior Mirrors
Adjust the exterior mirrors by touching Controls >
Mirrors. Press the left scroll button on the steering yoke
to choose whether you are adjusting the Left or Right
mirror. Then use the left scro
Folding Mirrors at Specific
Locations
In addition to having mirrors fold automatically
whenever you park Model S, you can fold (and unfold)
mirrors anytime your driving speed is less than 31 mph
(50 km/h). This is useful for parking in
SEE MORE:
Map Display
Touch these icons to customize what the map displays:
Display/hide satellite imagery
(if equipped
with premium connectivity).
Display/hide traffic conditions
(if equipped
with premium connectivity). Green lines
indicate no traffic; orange lines indicate
light traffic; red lines indicate moder
Adjusting the Front Seats
Move seat forward/backward and adjust the seat's
height and tilt angle up/down.
Adjust backrest.
Adjust lumbar support.
WARNING: Before adjusting a front seat, check
that the area around the seat is free of obstacles
(people and objects).
WARNING: Do not adjust seats while driving.
© 2019-2026 Copyright www.tesms.org
