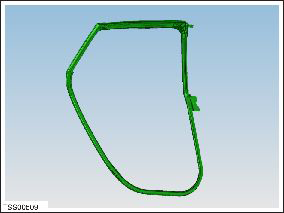
Tesla Model S: Seal - Body - Side - Rear - Primary - LH (Remove and Replace)
Tesla Model S (2012-2026) Service Manual / Closures / Seal - Body - Side - Rear - Primary - LH (Remove and Replace)
Removal
- Remove 'B' post upper trim (refer to procedure)
- Release clip (x1) securing rear door seal to body.
- Carefully release seal from rocker panel and work toward upper section of seal.
- Release remaining seal from brightwork.
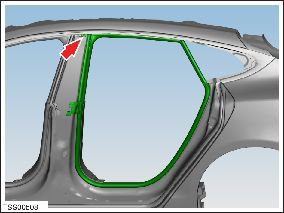
- Remove seal.
READ NEXT:
 Seal - Door - Front - A Pillar - Margin - LH (Remove and Replace)
Removal
Open vehicle door, ensuring good access.
Carefully release clip (x1) securing top of flap seal to door.
Caution: Take care not to damage component(s).
Seal - Door- Front - Rocker - LH (Remove and Replace)
Warning: If the vehicle has air suspension, activate "Jack"
mode on the touchscreen before raising and supporting the vehicle.
Removal
Raise and support the vehicle (refer to procedu
Seal - Door - Front - LH (Remove and Replace)
Removal
Remove door trim (refer to procedure)
Release clips (x4) securing flap seal ends front and rear.
Note: Components have been removed in this graphic
SEE MORE:
Coat Hangers
Your Model S has a coat hanger on each side of the
vehicle above the rear window in the second row, next to
the reading light. Push the coat hanger to release it.
Push it again to retract it.
Active Road Noise Reduction
Model S is equipped with Active Road Noise Reduction
which reduces low-freq
Powertrain Coolant Pump 2 (Remove and Replace)
Coolant pump locations:
RWD Model S
Dual Motor Model S
1
Powertrain coolant pump 1
RWD vehicle
2
Battery coolant pump 2
RWD vehicle
3
Battery coolant pump 1
RWD vehicle
© 2019-2026 Copyright www.tesms.org
