Tesla Model S: Seal - Door Front Outer Belt - LH (Remove and Replace)
Tesla Model S (2012-2026) Service Manual / Closures / Seal - Door Front Outer Belt - LH (Remove and Replace)
Removal
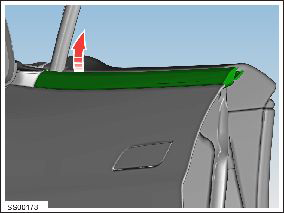
- Lower window glass.
- Using a suitable tool release outer belt seal, starting at the
mirror and working backwards.
Caution: Protect paintwork from possible damage during this procedure.
Caution: Take care not to damage component(s).
- Release hook end from door skin and remove rear end of seal.
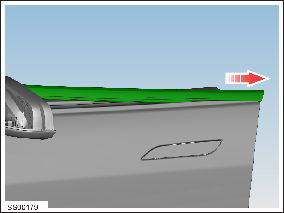
- Installation procedure is the reverse of removal.
- In the event of seal being damaged at rear end, it will be necessary to replace component.
- Check for smooth operation when opening and closing window glass.
READ NEXT:
 Seal - Door Front Inner Belt - LH (Remove and Replace)
Removal
Lower door glass.
Remove door trim panel (refer to procedure)
Remove trim stud securing flap seal to door.
Carefully ease flap seal clear of inner belt seal for access.
Seal - Belt - Door Inner - Rear - LH (Remove and Replace)
Removal
Lower door glass.
Remove door trim panel (refer to procedure)
Release trim studs (x2) securing flap seal to door.
Carefully ease flap seals clear of inner belt seal for ac
Seal - Door Rear Outer Belt - LH (Remove and Replace)
Removal
Lower window glass.
Using a suitable tool release outer belt seal, release leading
edge and work rearward.
Caution: Protect paintwork from possible damage during
SEE MORE:
Bracket - License Plate - Front (Retrofit)
Special tool required for this procedure:
Supplier
Part Number
Description
Tesla
223-28550-TSL
WIHA (TORQUE SCREWDRIVER .1 -
.6NM)
Procedure
Center Console
In addition to housing an RFID transmitter that reads key
fobs and key cards (see Keys), the center
console includes cup holders, two storage
compartments, wireless phone chargers, and a rear
touchscreen.
To open the main storage compartment, pull its cover
upward. Open the front storage compa
© 2019-2026 Copyright www.tesms.org
