Tesla Model S: Back Rest Assembly - Seat - 2nd Row - LH (Remove and Install)
Tesla Model S (2012-2026) Service Manual / Seats / Back Rest Assembly - Seat - 2nd Row - LH (Remove and Install)
Removal
- Remove rear seat base cushion for access (refer to procedure)
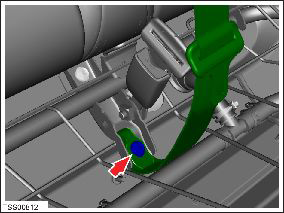
- Remove the bolt that secures the seat belt to the 2nd row seat
base frame (torque 40 Nm).
Caution: This bolt is a one time use component. Ensure
that a new bolt is used during reinstallation.
- Remove LH rear seat bolster (refer to procedure)
- Release LH rear seat back rest pivot retaining clip.
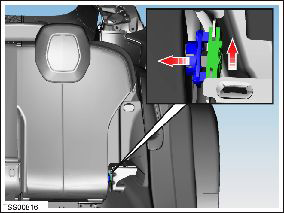
- Reposition rear seat back rest upwards and release pivot from retaining bracket.
- Reposition rear seat back rest and release back rest from inner
pivot retaining bracket.
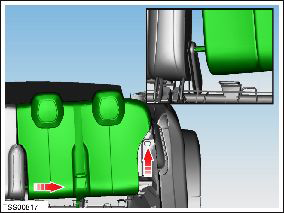
- Remove rear seat back rest assembly.
READ NEXT:
 Back Rest Assembly - Seat - 2nd Row - RH (Remove and Install)
Removal
Remove RH rear seat bolster (refer to procedure)
Use a pry tool to release the grommet that secures the RH 2nd
row backrest.
Back Rest Assembly - 2nd Row - Executive (Remove and Replace)
Removal
Remove the LH and RH lower seat cushions (refer to procedure).
On each side of the vehicle, remove the screw that secures the
closeout panel to the seat frame (to
Assembly - Back Rest - Driver's Seat (Remove and Replace)
Removal
Remove driver's seat assembly (refer to procedure)
Place seat on clean work surface.
Remove screw securing outer side cover to seat (torque 1 Nm).
SEE MORE:
LF Antenna - RH - A Post (Remove and Replace)
Warning: If the vehicle has air suspension, activate "Jack"
mode on the touchscreen before raising and supporting the vehicle.
Removal
Raise and support the vehicle (refer to procedure)
Remove RH front wheel arch liner for access (refer to procedure)
Locate LF anten
Glass - Door Mirror - LH (Remove and Replace)
Warning: To avoid personal injury, eye protection must be
worn when performing this operation.Warning: To avoid personal injury, wear cut-resistant
gloves when performing this operation.
Removal
Carefully push the inboard side of the door mirror glass into
the assembl
© 2019-2026 Copyright www.tesms.org
