Tesla Model S: Seat Belt Assembly - 3rd Row - LH (Remove and Replace)
Tesla Model S (2012-2026) Service Manual / Safety and Restraint / Seat Belt Assembly - 3rd Row - LH (Remove and Replace)
Removal
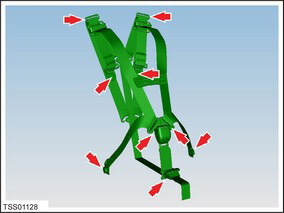
- Maneuver the 3rd row seat for access to the anchor points (x4).
- Remove the bolts (x4) that secure the seat belt to the body and seat back (torque 45 Nm).
- Release and remove the seat belt buckle webbing from the main assembly.
- Release the seat belt webbing from the floor-mounted anchor point.
- Release the seat belt shoulder mounting from the seat slots.
- Remove the seat belt assembly from the vehicle.
Installation procedure is the reverse of removal, except for the following:
Caution: Check the seat belt webbing for damage and wear and tear. If in doubt replace the seat belt.
READ NEXT:
 Buckle Assembly - 3rd Row - LH (Remove and Replace)
Warning: Prior to disconnection of 12 volt power supply,
ensure driver's door glass is in the fully open position. Failure to
follow this instruction could result in vehicle lockout.
Warni
Pre-Tensioner - Outboard Lap - 1st Row - LH (Remove and Replace)
Removal
Disconnect 12V power.
Rear wheel drive (RWD): Refer to
procedure.
Dual Motor: Refer to procedure.
Use a trim tool to carefully relea
Pyrotechnic Fuse (Remove and Replace)
Warning: Prior to disconnection of 12 volt power supply,
ensure driver's door glass is in the fully open position. Failure to
follow this instruction could result in vehicle lockout.
Warni
SEE MORE:
Low voltage battery service is required
Schedule service - Vehicle may not restart
The low voltage battery cannot provide the electrical support necessary to
drive or continue driving.
If this alert is present while you are driving, your vehicle needs to come to a
stop as soon as possible. Pull over safely
at your earliest opportunity
Mounting - Air Conditioning Compressor (Remove and Replace)
Removal
Remove air conditioning compressor (refer to procedure)
Unscrew compressor isolators from mounting bracket.
Note: Inspect mounting rubber and replace as
necessary.
Note: It is recommended that if one
mounting requires replacement, that all f
© 2019-2026 Copyright www.tesms.org
