Tesla Model S: Pyrotechnic Fuse (Remove and Replace)
Warning: Prior to disconnection of 12 volt power supply, ensure driver's door glass is in the fully open position. Failure to follow this instruction could result in vehicle lockout.
Warning: If 12 volt power supply is disconnected, do not attempt to open any doors with door glass in closed position. Failure to follow this instruction could result in door glass shatter.
Removal
- Power the vehicle off from the MCU.
- Disconnect 12V power.
- Rear wheel drive (RWD): Refer to procedure.
- Dual Motor: Refer to procedure.
- Remove the pollen filter rear housing:
- If equipped, release the 2 barrel clips that secure the HV harness to the bulkhead.
- Loosen the top right nut that secures the pollen filter rear
housing to the bulkhead (torque 6 Nm).
Note: It is not necessary to completely remove the nut; the tab on the housing is notched.
.png)
- Remove the remaining nuts (x3) that secure the pollen filter
rear housing to the bulkhead (torque 6 Nm).
Note: The 2 lower nuts secure the HVAC intake drain diverter.
.png)
- Remove the nuts (x2) that secure the fuse box cover (torque 3
Nm).
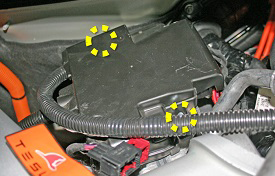
- Ensure that there is no power going to the pyrotechnic fuse.
- Remove the nuts (x2) that secure the pyrotechnic fuse (torque 12
Nm). Disconnect the pyrotechnic fuse connector.
.png)
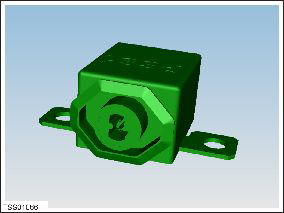
- Remove the pyrotechnic fuse from the vehicle.
Installation procedure is the reverse of removal.
READ NEXT:
 Sensor - Intrusion - Door - Front (Remove and Replace)
Removal
Remove door trim panel (refer to procedure)
Remove screws (x2) securing impact sensor to door (torque 5 Nm).
Disconnect sensor harness connection.
Sensor - Impact - Front (Remove and Replace)
Warning: To avoid personal injury, observe all relevant
safety precautions before removing or testing any SRS components.
Removal
Remove the underhood storage unit:
Sensor - Impact - B Pillar (Remove and Replace)
Removal
Remove the B-pillar lower trim (refer to procedure).
Disconnect the impact sensor harness connector.
Remove the bolt that secures the impact sensor to the B-pillar
(torque
SEE MORE:
Link - Lower - Fore - LH (Remove and Replace)
Warning: If the vehicle has air suspension, activate "Jack"
mode on the touchscreen before raising and supporting the vehicle.
Removal
Loosen the front LH lug nuts.
Raise and support the vehicle (refer to procedure)
Warning: Do not work on an incor
Door Glass - LH - Front - Adjust
Removal
Remove door trim pad (refer to procedure)
Loosen but do not remove clamp nut securing door glass to
regulator (torque 7.5 Nm). This allows glass to move fore and aft.
Caution: Take care not to damage component(s).
