Tesla Model S: Buckle Assembly - 3rd Row - LH (Remove and Replace)
Tesla Model S (2012-2026) Service Manual / Safety and Restraint / Buckle Assembly - 3rd Row - LH (Remove and Replace)
Warning: Prior to disconnection of 12 volt power supply, ensure driver's door glass is in the fully open position. Failure to follow this instruction could result in vehicle lockout.
Warning: If 12 volt power supply is disconnected, do not attempt to open any doors with door glass in closed position. Failure to follow this instruction could result in door glass shatter.
Removal
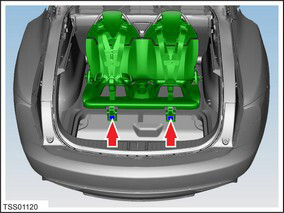
- Raise 3rd row seats if folded into trunk well.
- Position seat belt aside for access to the bolt.
- Remove bolt securing 3rd row seat belt buckle to body (torque 40 Nm).
- De- Latch buckle from seat belt and remove buckle from vehicle.
- Inspect belt webbing for wear and tear, if buckle or webbing show signs of damage replace component.
Installation procedure is the reverse of removal.
READ NEXT:
 Pre-Tensioner - Outboard Lap - 1st Row - LH (Remove and Replace)
Removal
Disconnect 12V power.
Rear wheel drive (RWD): Refer to
procedure.
Dual Motor: Refer to procedure.
Use a trim tool to carefully relea
Pyrotechnic Fuse (Remove and Replace)
Warning: Prior to disconnection of 12 volt power supply,
ensure driver's door glass is in the fully open position. Failure to
follow this instruction could result in vehicle lockout.
Warni
Sensor - Intrusion - Door - Front (Remove and Replace)
Removal
Remove door trim panel (refer to procedure)
Remove screws (x2) securing impact sensor to door (torque 5 Nm).
Disconnect sensor harness connection.
SEE MORE:
Hub - Rear - LH (Remove and Replace)
Special tool(s) required for this procedure:
Supplier
Part Number
Description
Tesla
1062500-00-A
Magnetic Field Viewing Card
Tesla
1082171-00-A
S-hook
Warning: If
Fork and Control Link - Door - Exterior Handle - Front - LH (Remove and
Replace)
Removal
Remove Door Motor (refer to procedure)
Remove Door Grip (refer to procedure)
Remove press sensor screw.
Release door press sensor wiring connector.
Remove pivot pin connecting control link to PVT cartrid
© 2019-2026 Copyright www.tesms.org
