Tesla Model S: Tuner - AM - FM (Remove and Replace)
Tesla Model S (2012-2026) Service Manual / Infotainment / Tuner - AM - FM (Remove and Replace)
Note: This procedure applies to both base and premium tuners (premium pictured).
Removal
- Remove the driver side lower dash trim (refer to procedure).
- Remove the driver side dash footwell closing trim (refer to procedure).
- Remove the 3 bolts that secure the retaining bracket to the
cross car beam (torque 6 Nm).
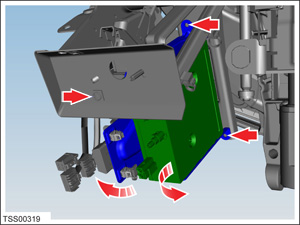
- Carefully lower the bracket into the footwell, to improvess access to the tuner.
- Disconnect the 3 wiring harness connectors.
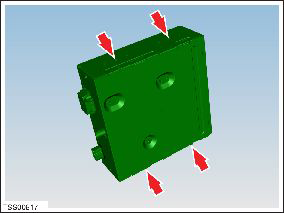
- Remove screws (x4) securing AM/FM module to bracket (torque 1
Nm).
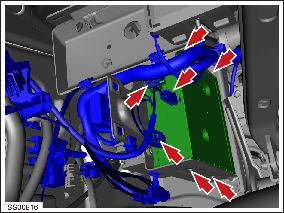
- Carefully remove the module.
Installation procedure is the reverse of removal, except for the following: Use Toolbox to update or redeploy the firmware:
- If the vehicle is not running the latest firmware, run the "Vehicle Firmware Update" procedure.
- If the vehicle is running the latest firmware, run the "Firmware Redeploy" procedure.
READ NEXT:
 Antenna Amplifier - AM/FM and RKE (Remove and Replace)
Removal
Remove the LH liftgate trim (refer to procedure).
Remove the screw that secures the amplifier to the liftgate.
Carefully disconnect the amplifier connector.
Release th
Antenna - RF Filter - RH (Remove and Replace)
Removal
Remove the RH liftgate trim (refer to procedure).
Remove the screw that secures the RF filter to the liftgate
(torque 1 Nm).
Antenna - Satellite Radio - Liftgate-Mounted (Remove and Replace)
Note: This procedure is for vehicles built before December
23, 2014. On newer vehicles, the satellite radio antenna is located
under the panoramic roof fixed glass (refer to procedure).
Re
SEE MORE:
Module - Body Controller - BCM (RHD) (Remove and Replace)
Removal
Remove the active suspension ECU (refer to procedure).
Remove the RH center console closeout extension (refer to
procedure).
Remove the RH footwell cover (refer to procedure).
Place a rag under the HVAC drain hose to catch any remaining
fluid.
Twist the hose
2nd Row Center Console Assembly (Remove and Replace)
Removal
Fold the RH 2nd row back rest.
Loosen the 2nd row center console tether strap behind the center
seat.
Unclip the tether latch from the child seat anchor.
Pull the tether out between the seat and the back re
© 2019-2026 Copyright www.tesms.org
