Tesla Model S: Spring and Damper Assembly - Front - LH (Remove and Replace)
Removal
- Remove the front road wheel (refer to procedure).
- Lower the vehicle.
- Remove the underhood apron (refer to procedure).
- Remove the nuts (x3) that secure the coil spring module top
mounting (torque 39 Nm).
.png)
- Raise the vehicle.
- Release the wheel speed sensor harness from the knuckle.
- Remove the nut and bolt that secure the upper control arm to the
knuckle (torque 60 Nm).
.png)
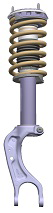
- Note the orientation of the clip that secures the brake hose to the spring and damper assembly. Release the clip.
- Remove the nut and bolt that secure the spring and damper
assembly to the lower arm (torque 140 Nm).
Caution: Take care not to damage component(s).
Caution: Replace all nylon-insert locknuts.
Note: The following image shows a rear wheel drive (RWD) assembly. The assembly in a dual motor (DM) vehicle looks different.
.png)
- Release the spring and damper assembly from the lower arm.
.png)
- Remove the spring and damper assembly.
Caution: Ensure that you do not damage the halfshaft if removing a spring and damper assembly from a DM vehicle.
RWD spring and damper assembly DM spring and damper assembly 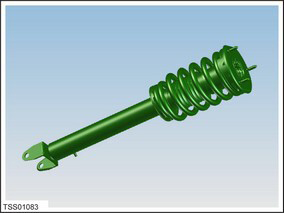
Installation procedure is the reverse of removal, except for the following:
Caution: Replace all nylon-insert locknuts.
Note: Clean the affected areas before installation.
Caution: Only fully tighten suspension nuts and bolts when the vehicle is on a 4-post lift and the suspension is in the ride height position.
Ensure that the clip that secures the brake hose to the spring and damper assembly is installed correctly.
- Rear wheel drive (RWD) vehicles: The hose
and the clip are installed from the same direction.
Note: Ensure that the clip is fully seated, with the "fingers" both remaining on the bottom side of the retaining bracket.
Top view, RWD (correct) Bottom view, RWD (correct) .png)
.png)
- Dual motor (DM) vehicles: The clip is
installed from the rear.
Note: Ensure that the clip is fully seated, with the "fingers" both remaining on the bottom side of the retaining bracket.

Top view, DM (incorrect)
Top view, DM (correct)
Bottom view, DM (correct)
READ NEXT:
 Spring and Damper Assembly - Rear - LH (Remove and Replace)
Removal
Remove the LH rear wheelarch liner (refer to procedure).
Remove the parking brake caliper (refer to procedure).
Remove the mid aero shield (refer to procedure).
Remove the
SEE MORE:
Assembly - Panel - Wrapped - LH (Remove and Replace)
Removal
Release the clips (x10) that secure the wrapped panel trim.
Note: Components have been removed in this graphic
to aid clarity.
Remove the LH wrapped panel trim.
Charging stopped - Charge cable disconnected
Close charge port - Press brake pedal and retry
Charging has stopped because your vehicle has detected that the connection
between the charge port and charge
cable has been unexpectedly interrupted.
Before disconnecting a charge cable, make sure you first stop charging.
With some external chargi
