Tesla Model S: Applique - Fascia - Front - 1st Generation (Remove and Replace)
Tesla Model S (2012-2026) Service Manual / Body / Applique - Fascia - Front - 1st Generation (Remove and Replace)
Note: This procedure describes how to remove and replace the 1st generation front fascia applique. If the vehicle is equipped with a 2nd generation front fascia applique, refer to procedure 10011302 (refer to procedure).
Removal
- Remove the front fascia grill (refer to procedure).
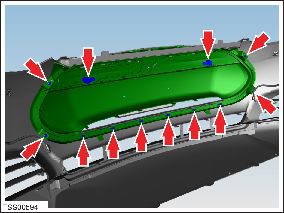
- If installed, remove the clips (x3) that secure the license
plate mounting panel to the applique. Remove the license plate
mounting panel.
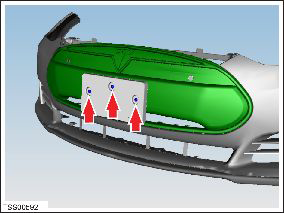
- If installed, disconnect the parking sensor connectors (x2).
- Release the harness clips (x7) that secure the fascia harness to
the applique.
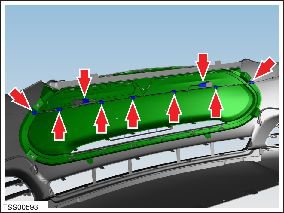
- Carefully release the parking distance sensors (x2) from the applique retaining rings.
- Carefully release and remove the sensor retaining rings (x2) from the applique. Caution: Care must be taken to avoid damage to paintwork and exterior trim.
- Remove the screws (x4) that secure the applique to the fascia (torque 1 Nm).
- Release the clips (x6) that secure the applique to the fascia.
Installation procedure is the reverse of removal, except for the following:
If using this procedure to convert the old fascia assembly to the new fascia assembly, use Toolbox to update the PSRCM calibration. Refer to SB-13-17-002 for affected VINs and calibration instructions.
READ NEXT:
 Applique - Fascia - Front - 2nd Generation (Remove and Install)
Note: This procedure describes how to remove and
install the 2nd generation front fascia applique. If the vehicle is
equipped with a 1st generation front fascia applique, refer to
procedur
Applique - Fascia - Front - 2nd Generation (Remove and Replace)
Note: This procedure describes how to remove and replace
the 2nd generation front fascia applique. If the vehicle is equipped
with a 1st generation front fascia applique, refer to procedure
Grill - Fascia - Front (Remove and Replace)
Removal
Vehicles with 1st generation front fascia applique only:
Remove the front fascia applique refer to procedure.
Vehicles with 2nd generation front fascia applique only:
Remo
SEE MORE:
Antenna - Satellite Radio - Roof-Mounted (Remove and Replace)
Note: This procedure is for vehicles with panoramic roofs
built after December 23, 2014. On older vehicles, the satellite
radio antenna is located under the liftgate glass (refer to
procedure).
Removal
Remove the panoramic roof fixed glass (refer to procedure).
Remove
Guidelines for Seating Children
Your Model S seat belts are designed for adults and larger children. You must
restrain infants and small children in
the rear seats only, and you must use a suitable child safety seat appropriate
for the child's age, weight, and size.
WARNING: Never seat a child in the front row passenger seat,
© 2019-2026 Copyright www.tesms.org
