Tesla Model S: Switch - Seat Height Adjust - Driver's Seat (Remove and Replace)
Tesla Model S (2012-2026) Service Manual / Seats / Switch - Seat Height Adjust - Driver's Seat (Remove and Replace)
Removal
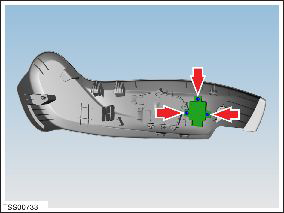
- Remove driver seat outer side cover (refer to procedure)
- Remove screws (x3) securing lumbar adjust switch to cover
(torque 1 Nm).

- Remove lumbar adjust switch.
READ NEXT:
 Switch - Back Rest and Cushion Adjust - Driver's Seat (Remove and Replace)
Removal
Remove driver seat outer side cover (refer to procedure)
Remove screws (x4) securing back rest and cushion adjust switch
to cover (torque 1 Nm).
 Seat Assembly - Driver's (Remove and Install)
Removal
Note the customer's seating profile.
Position the vehicle to provide good access to the driver's
seat.
Power the seat fully rearward for access.
Release the clips (x4)
 Seat Cushion - Lower - 2nd Row (Remove and Install)
Removal
Remove the 2nd row center console assembly, if installed (refer
to procedure).
Gently lift up the LH side of the 2nd row seat bottom cushion to
expose the grommet tower.
SEE MORE:
 Gearbox Fluid - Front (Remove and Replace)
Special tool required for this procedure:
Supplier
Part Number
Description
Tesla
1054946-00-A
Fluid Transfer Pan
Drain & Refill
Remove the underhood storage
 HV Junction Box - Cover - 2nd Generation (Remove and Replace) - Removal
Warning: Only technicians who have been trained in High
Voltage Awareness are permitted to perform this procedure. Proper
personal protective equipment (PPE) and insulating HV gloves with a
minimum rating of class 00 (500V) must be worn any time a high
voltage cable is handled. Refer
© 2019-2026 Copyright www.tesms.org

