
Tesla Model S: Tire - Front - LH
Tesla Model S (2012-2026) Service Manual / Wheels and Tires / Tire - Front - LH
Warning: Always read and understand the tire equipment operator's manual before operating the wheel balancer or tire changer.
Note: These instructions are based on the Hunter TC3900 tire changer. Some steps might be different for other tire changers. Refer to the operator's manual for specific information.
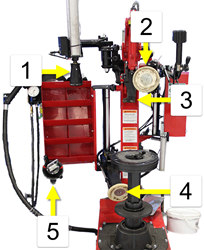
| 1 | Bead press arm |
| 2 | Upper bead roller |
| 3 | Mount head |
| 4 | Lower bead roller |
| 5 | Center clamp and cone |
- Remove the front road wheel (refer to procedure).
- Place the wheel on the tire changer, with the front of the wheel facing up.
- Insert the center clamp.
- Tighten the cone on the center clamp.
- Remove the valve core.
- Position the upper bead roller at the edge of the rim.
- Rotate the tire to loosen the upper bead. Lubricate the bead as the tire rotates. Caution: The TPMS sensor is close to the rim. Do not damage the TPMS sensor when loosening the upper bead.
- Position the lower bead roller at the edge of the rim.
- Rotate the tire to loosen the lower bead. Lubricate the bead as the tire rotates.
- Position the mount head at the edge of the rim, then lift the mount head to hook the upper bead.
- Rotate the tire to pull the upper bead above the rim. Lubricate the bead as the tire rotates.
- Use the lower bead roller to lift the tire off of the rim.
- Thoroughly lubricate both beads.
- If the tire has "outside", "side facing outwards", or a direction of rotation arrow on the sidewall, ensure that the tire is oriented properly.
- Push the lower bead of the tire over the rim by hand.
- Position the mount head on the upper bead.
- Use the bead press arm to push down on the sidewall.
- Slowly rotate the tire to push the upper bead below the rim.
- Attach the air chuck to the valve stem.
- Use the foot pedal to inflate the tire to approximately 40 PSI (275 kPa). Warning: The pressure gauge shows accurate pressure when the pedal is released. Repeatedly press and release the pedal to avoid overinflation. Warning: Do not exceed the pressure indicated on the tire sidewall.
- Have the valve stem removal tool ready for the next step.
- Remove the air check from the valve stem, then install the valve core.
- Balance the tire (refer to procedure).
- Record the road force on the Repair Order.
Note: If installing multiple tires, record the road force for each tire on the Repair Order.
READ NEXT:
 Tire - Front - LH - Rebalance
Warning: Always read and
understand the tire equipment operator's manual and on-screen
instructions before operating the wheel balancer or tire changer.
Note: These instructions are
based on
Wheel (Remove and Install)
Warning: If the vehicle
has air suspension, activate "Jack" mode on the touchscreen before
raising and supporting the vehicle.
Note: Vehicles with air
suspension might need the suspens
Wheels - Axle Set (Remove and Install)
Warning: "Jack mode" must
be activated on vehicles with air suspension before lifting the
vehicle. Failure to do this might lead to suspension damage and
could cause serious personal injur
SEE MORE:
Speed Assist
How Speed Assist Works
Model S displays a speed limit on the instrument panel
and you can choose if and how you are warned when
you exceed the speed limit. Also, instead of using the
detected speed limit, you can base warnings on an
arbitrary speed limit that you enter manually.
In situations w
Assembly - Cover - Footwell - LH (Remove and Replace)
Removal
Fully open the driver's door.
Move the driver's seat rearward for access.
Remove the LH center console closeout extension (refer to
procedure)
Remove the screws (x2) that secure the footwell closing trim to
the dash (torque 2 Nm).
© 2019-2026 Copyright www.tesms.org
