Tesla Model S: Vehicle Electrical Isolation Procedure
Warning: Only technicians who have been trained in High Voltage Awareness are permitted to perform this procedure. Proper personal protective equipment (PPE) and insulating HV gloves with a minimum rating of class 00 (500V) must be worn any time a high voltage cable is handled. Refer to Tech Note TN-15-92-003, "High Voltage Awareness Care Points" for additional safety information.
Warning: If the 12V power supply is disconnected, do not attempt to open any doors with door glass in closed position. Failure to follow this instruction could result in door glass shatter.
Note: Before disconnecting the 12V power supply, ensure that the driver's door window is fully open. Failure to follow this instruction could result in vehicle lockout.
Disconnect 12V and HV power
- Disconnect 12V power.
- Rear wheel drive (RWD): Refer to procedure.
- Dual Motor: Refer to procedure.
- Ensure that the first responder loop (X536) has been disconnected for at least 2 minutes.
- Check for the presence of high voltage at the Drive Inverter or High Voltage Junction Box. Refer to the "Checking for High Voltage at the Drive Inverter" or "Checking for High Voltage at the High Voltage Junction Box (HVJB)" section of this procedure.
Note: This procedure can only be performed on vehicles with the large rear drive unit. If the vehicle has the small rear drive unit, perform the "Checking for High Voltage at the High Voltage Junction Box (HVJB)" section of this procedure instead.
- Raise and support the vehicle (refer to procedure).
- Remove the mid aero shield (refer to procedure).
Warning: Ensure that the multimeter and leads are capable of handling at least 500V.
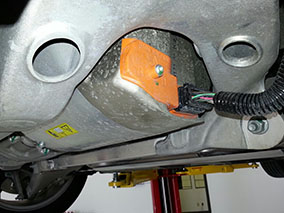
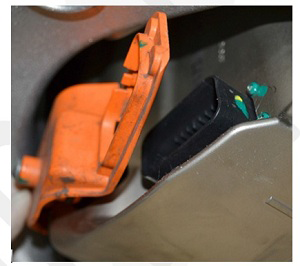
- Disconnect the low voltage harness, then release the bolt and
remove the orange drive inverter cover (torque 3 Nm).

- Remove both O-rings from the drive inverter cover and discard.
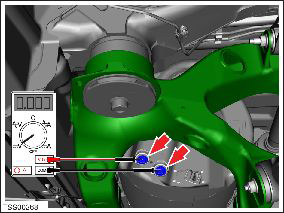
- Use the drive inverter case as a chassis ground. Measure the
following voltages:
- B+ to ground
- B- to ground
- B+ to B-

Warning: If any voltage reading is more than 10V, the high voltage contactors are not fully opened. Due to the risk of electrocution, contact Service Engineering before performing any further work.

Checking for High Voltage at the High Voltage Junction Box (HVJB) Remove the HVJB cover:
- 1st Generation: Refer to procedure.
- 2nd Generation: Refer to procedure.

