Tesla Model S: Trim - 'B' Post - Upper - LH (Remove and Replace)
Tesla Model S (2012-2026) Service Manual / Interior trim / Trim - 'B' Post - Upper - LH (Remove and Replace)
Removal
- Remove the LH lower 'B' post trim (refer to procedure).
- Remove the plastic trim that covers the seat belt fixing on the
driver's seat.

- Remove the bolt that secures the fixed seat belt end to pre-tensioner
(torque 9 Nm).
- Carefully release the clips (x4) that secure the seat belt guide to the 'B' post upper trim and position aside.
- Carefully release the clips (x2) that secure the upper trim to
the body. Roll the lower edge away from the body and release the lug
from the headlining.
Caution: Take care not to damage component(s).
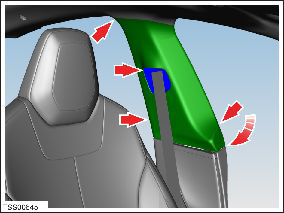
- Move the 'B' post trim away from the body and remove the screws
(x3) that secure the seatbelt guide to the rear of the 'B' post
trim.

- Remove the seat belt with the 'B' post guide.
- Remove the 'B' post trim and release it from the seatbelt.
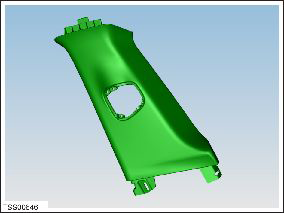
Installation procedure is the reverse of removal.
READ NEXT:
 Trim - 'B' Post - Lower - LH (Remove and Install)
Removal
Power the seat forward to gain access to the 'B' post.
Carefully release the leading edge of the rear rocker panel trim
for access.
Caution: Take car
Trim - 'C' Post Upper - LH (Remove and Replace)
Removal
Open LH rear door.
Fold rear seat back forward for access.
Using a suitable tool carefully release clips (x4) securing 'C'
post trim to body.
Caution: Take car
Trim - 'C' Post Rear - LH (Remove and Replace)
Removal
Remove the parcel shelf, if equipped.
If the LH C-Pillar rear trim panel has a liftgate switch, reach
behind the C-pillar rear trim panel and push the switch out from the
SEE MORE:
Approved Methods for Transporting
A flatbed truck or comparable transport vehicle is the
recommended method of transporting Model S. The
vehicle can face either direction when using a flatbed.
If Model S must be transported without a flatbed truck,
then wheel lifts and dollies must be used to ensure that
all four wheels are off
Headlining (Remove and Replace)
Removal
Remove front windshield (refer to procedure)
Lower headlining for access (refer to procedure)
With assistance remove headlining through front windshield
opening.
Remove rear map lamps from headlining.
© 2019-2026 Copyright www.tesms.org
