Tesla Model S: Trim - 'B' Post - Lower - LH (Remove and Install)
Tesla Model S (2012-2026) Service Manual / Interior trim / Trim - 'B' Post - Lower - LH (Remove and Install)
Removal
- Power the seat forward to gain access to the 'B' post.
- Carefully release the leading edge of the rear rocker panel trim for access. Caution: Take care not to damage component(s).
- Carefully release the trailing edge of the front rocker panel trim for access.
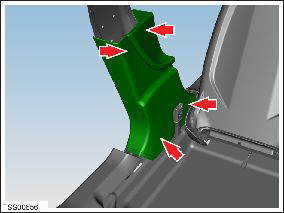
- Remove the screws (x2) that secure the lower 'B' post lower trim to the body (torque 2 Nm).
- Carefully release the clips (x4) that secure the 'B' post lower
trim to the body.
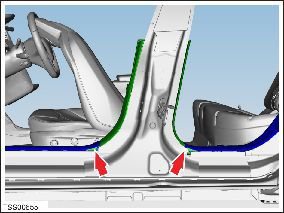
- Lift the trim to clear the seat and pre-tensioner.
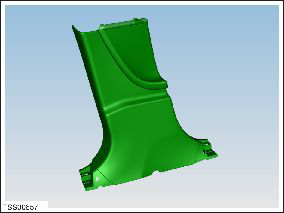
- Remove the 'B' post lower trim.
Installation procedure is the reverse of removal, except for the following:
Caution: Replace any broken clips.
READ NEXT:
 Trim - 'C' Post Upper - LH (Remove and Replace)
Removal
Open LH rear door.
Fold rear seat back forward for access.
Using a suitable tool carefully release clips (x4) securing 'C'
post trim to body.
Caution: Take car
Trim - 'C' Post Rear - LH (Remove and Replace)
Removal
Remove the parcel shelf, if equipped.
If the LH C-Pillar rear trim panel has a liftgate switch, reach
behind the C-pillar rear trim panel and push the switch out from the
Trim - Sill Panel - LH - Rear (Remove and Replace)
Removal
Remove the 'C' post LH rear trim (refer to procedure).
Remove the 'C' post LH upper trim (refer to procedure).
Fold the 2nd row seat backrests all the way forward.
Remove
SEE MORE:
Polishing, Touch Up, and Body
Repair
To preserve the cosmetic appearance of the body, you
can occasionally treat the paint surfaces with an
approved polish containing:
Very mild abrasive to remove surface contamination
without removing or damaging the paint.
Filling compounds that fill scratches and reduce their
visibility.
W
Fan - Condenser - RH (Remove and Replace)
Removal
Remove the front wheel arch liner (refer to procedure).
If equipped, release the bolts (x2) that secure the front bumper
support bar (torque 11 Nm). Remove the bar from the vehicle.
Disconnect the fan motor
© 2019-2026 Copyright www.tesms.org
