Tesla Model S: Vent - Center Console (Remove and Replace)
Tesla Model S (2012-2026) Service Manual / Interior trim / Vent - Center Console (Remove and Replace)
Removal
- Remove center console rear closing panel (refer to procedure)
- Move front center arm rests forward.
- Using a suitable tool depress clips (x4) securing rear vent to
center console.
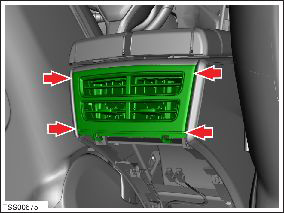
- Remove rear vent.

Installation procedure is the reverse of removal.
READ NEXT:
 Center Console Assembly (Remove and Replace)
Removal
Remove the drop in center console assembly, if installed (refer
to procedure).
Remove the under-screen cubby.
Remove the LH center console closeout extension (refer to
Drop In Center Console Assembly (Remove and Replace)
Removal
Move the front seats to their rearmost positions to allow for
additional access.
Unplug the phone adaptor cable from the USB connector, if
installed.
2nd Row Center Console Assembly (Remove and Replace)
Removal
Fold the RH 2nd row back rest.
Loosen the 2nd row center console tether strap behind the center
seat.
Unclip the tether latch from the child seat anchor.
SEE MORE:
Condenser - Gas Cool (Remove and Replace)
Removal
Recover refrigerant from the vehicle (refer to procedure)
Remove front aero shield panel (refer to procedure)
Remove front LH wheel arch liner (refer to procedure)
Remove bolts (x2) securing front bumper panel support bar and
remove (torque 11 Nm).
Neutral
Neutral allows Model S to roll freely when you are not
pressing the brake pedal. To shift into Neutral, do any of
the following:
Open Controls, then press and hold the Neutral icon
on the drive mode strip until Model S engages
Neutral.
Choose Neutral from the drive mode selector on th
© 2019-2026 Copyright www.tesms.org
