Tesla Model S: Trim - Rear View Mirror (Remove and Replace)
Tesla Model S (2012-2026) Service Manual / Interior trim / Trim - Rear View Mirror (Remove and Replace)
Removal
- Position vehicle for access to front doors.
- Cover dash assembly to avoid damage. Caution: Make sure the touch screen is fully protected.
- Working from passenger side, carefully release clips (x5)
securing RH and LH mirror finishers.
Caution: Take care not to damage component(s).
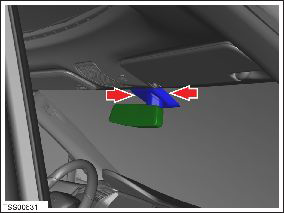
- Remove LH and RH mirror finishers.
Installation procedure reverse of removal.
READ NEXT:
 Finisher - Liftgate - Rear Window - Upper (Remove and Replace)
Removal
Position the vehicle for access to the tailgate.
Open the tailgate to working height.
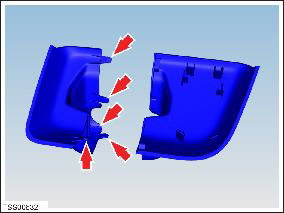
Carefully release the clips (x4) that secure the upper trim to
the tailgate.
Finisher - Liftgate - Rear Window - Lower (Remove and Replace)
Removal
Inspect the latch cover. If it is a separate trim part, remove
it with a trim tool. If is not a separate part, proceed to step 2.
Finisher - Liftgate - Rear Window - Side - LH (Remove and Replace)
Removal
Remove the upper rear window finisher (refer to procedure).
Release the clips (x3) and remove the tailgate side finisher.
Caution: Take care not to damage componen
SEE MORE:
Module - Air Suspension - ECU (RHD) (Remove and Replace)
Warning: If the 12V power supply is disconnected, do
not attempt to open any doors with door glass in closed position.
Failure to follow this instruction could result in door glass
shatter.
Note: Before disconnecting the 12V power supply,
ensure that the driver's door window
Shaft - Steering Column - Intermediate Lower (Remove and Replace)
Removal
Remove the underhood storage unit for access (refer to
procedure).
Mark the lower intermediate shaft position relative to the upper
intermediate shaft and pinion.
Remove the bolt that secures the lower intermediate shaft to the
steering rack (torque 49 Nm).
R
© 2019-2026 Copyright www.tesms.org
