Tesla Model S: Bracket - Vacuum Pump (Remove and Replace)
Tesla Model S (2012-2026) Service Manual / Brakes / Bracket - Vacuum Pump (Remove and Replace)
Warning: If the vehicle has air suspension, activate "Jack" mode on the touchscreen before raising and supporting the vehicle.
Removal
- Remove the front skid plate (refer to procedure).
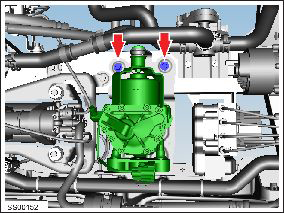
-
Remove the bolts (x2) that secure the vacuum
pump mounting bracket to the front bumper carrier (torque 6 Nm).

- Lower the vehicle.
- Remove the vacuum pump (refer to procedure).
-
Remove the bolts (x2) that secure the vacuum
pump mounting bracket to the front subframe (torque 6 Nm).
Note: Image shown with the vacuum pump installed.
- Remove the vacuum pump mounting bracket from the vehicle.
Installation procedure is the reverse of removal.
READ NEXT:
 Reservoir - Master Cylinder (Remove and Replace)
Removal
Remove the master cylinder and reservoir
assembly
(refer to procedure).
Release the reservoir to master cylinder fixing
lugs (x4).
Release the reservoir
Brake Lines - Booster to ABS (Dual Motor) (RHD) (Remove and Replace)
Removal
Recover the A/C refrigerant from the vehicle
(refer to procedure).
Remove the 12V battery bracket beam
(refer to procedure).
Release the fasteners (x2) that
Rear Park Brake Caliper Release
Caution: This method
requires replacing the caliper. To release a stuck caliper without
damaging it, refer to either:
Park Brake Caliper - Release - Harness Tool - Through Calipe
SEE MORE:
Lamp - Side Repeater - Front - LH (Remove and Replace)
Removal
Using a suitable tool carefully release fixing lugs (x2)
securing side repeater to front fender. NOTE: Wheel arch liner
removed for clarity.
Caution: Care must be taken to avoid damage to
paintwork and exterior trim.
Release side re
Vertical Alignment
Special tools required for this procedure:
Supplier
Part Number
Description
Tesla
1056984-00-A
Radar Calibration Bubble Level
- Cross Test
Tesla
1056723-00-A
© 2019-2026 Copyright www.tesms.org
