Tesla Model S: Battery - Auxiliary - 12V (RWD) (Remove and Replace)
Warning: If the 12V power supply is disconnected, do not attempt to open any doors with door glass in closed position. Failure to follow this instruction could result in door glass shatter.
Note: Before disconnecting the 12V power supply, ensure that the driver's door window is fully open. Failure to follow this instruction could result in vehicle lockout.
Removal
- Disconnect 12V power.
- Rear wheel drive (RWD): Refer to procedure.
- Dual Motor: Refer to procedure.
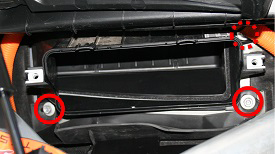
- Remove the pollen filter rear housing:
- If equipped, release the 2 barrel clips that secure the HV harness to the bulkhead.
- Loosen the top right nut that secures the pollen filter rear
housing to the bulkhead (torque 6 Nm).
Note: It is not necessary to completely remove the nut; the tab on the housing is notched.

- Remove the remaining nuts (x3) that secure the pollen filter
rear housing to the bulkhead (torque 6 Nm).
Note: The 2 lower nuts secure the HVAC intake drain diverter.
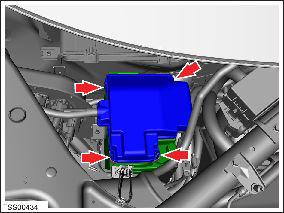
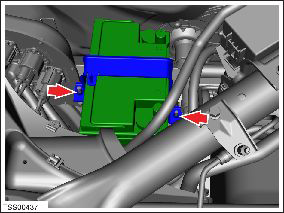
- Release the lugs (x4) that secure the battery fuse box cover.
Remove the cover.
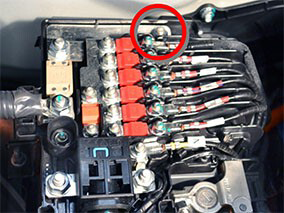
- Remove the nut that secures the body harness connector to the battery fuse box (torque 6 Nm).
- Remove the nut that secures the battery positive terminal to the
fuse box (torque 12 Nm).
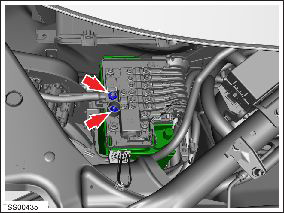
- Remove the nut that secures the battery fuse box to the battery
strap. Tie the battery fuse box aside (torque 6 Nm).
- Remove the nuts (x2) that secure the battery strap (torque 3.5
Nm). Remove the strap.
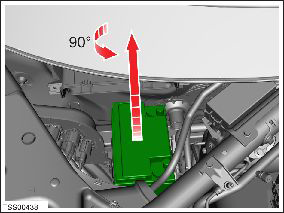
- Carefully lift the battery, turn it counter clockwise 90º, and
remove it through the opening.
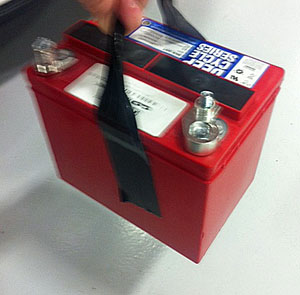
Note: It can be difficult to remove C&D brand batteries because they do not have handles. It might be helpful to use duct tape in order to lift the battery high enough so that it can be supported from the bottom:
- Cut a piece of high-strength duct tape, approximately 18 in (45 cm) in length.
- Attach the ends of the duct tape to the long sides of the battery, leaving a large section of duct tape free above the battery. Twist this section of the duct tape back onto itself in order to form a handle.
- Using the handle, slowly lift the battery until it can be
supported from the bottom.
Warning: Do not use the handle to fully lift the battery out of the vehicle. Only lift the battery high enough so that it can be supported from the bottom.
Installation procedure is the reverse of removal, except for the following:
- Ensure that the HVAC intake drain diverter is positioned properly when reinstalling the pollen filter front housing. Caution: Take care not to damage component(s).
- If changing from an Exide to a C&D battery, update the vehicle's
configuration with Toolbox.
- Connect a laptop with Toolbox to the vehicle.
- Select Views > Vehicle Configuration > Vehicle Configuration Update.
- In the "12V Battery Type" menu, select C&D.
READ NEXT:
 Battery - Auxiliary - 12V (RHD) (Remove and Replace)
Warning: If the 12V power supply is disconnected, do
not attempt to open any doors with door glass in closed position.
Failure to follow this instruction could result in door glass
shat
Battery - Auxiliary - 12V (Dual Motor) (Remove and Replace)
Warning: If the 12V power supply is disconnected, do
not attempt to open any doors with door glass in closed position.
Failure to follow this instruction could result in door glass
shat
12V Positive Jump Post (Remove and Replace)
Warning: Before disconnecting the 12 volt power supply,
ensure that driver's door window is fully open. Failure to follow
this instruction could result in vehicle lockout.
Warning: If the
SEE MORE:
Braking Systems
WARNING: Properly functioning braking systems
are critical to ensure safety. If you experience a
problem with the brake pedal, brake calipers, or
any component of a Model S braking system,
contact Tesla immediately.
Model S has an anti-lock braking system (ABS) that
prevents the wheels f
Before Using Summon
Before operating Summon, use the touchscreen to
enable it and customize how you want it to work. Touch
Controls > Autopilot > Customize Summon and adjust
the following settings to suit your preferences:
Bumper Clearance: Set the distance that you want
Summon to stop from a detected obje
