Tesla Model S: Window Motor/Regulator Assembly - Rear - LH (Remove and Replace)
Tesla Model S (2012-2026) Service Manual / Closures / Window Motor/Regulator Assembly - Rear - LH (Remove and Replace)
Removal
- Remove rear window glass (refer to procedure)
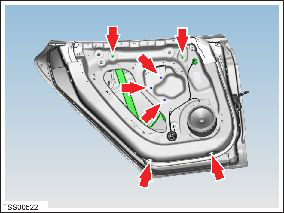
- Remove waterproof tape to expose nuts. Note: Components have been removed in this graphic to aid clarity.
- Remove nuts (x2) securing regulator to door upper fixed mounting (torque 10 Nm).
- Remove plugs (X2) to expose nuts in lower edge of door.
- Remove nuts (x2) securing regulator to door lower adjustable mounting (torque 10 Nm).
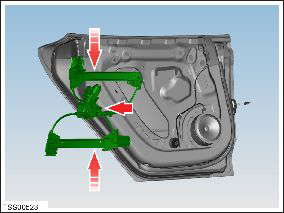
- Remove screws (x3) securing regulator motor to door inner
(torque 2.4 Nm).
Caution: Take care not to damage component(s).
- Carefully collapse regulator assembly and withdraw through door opening. As soon as the wiring harness connection to the motor can be accessed, disconnect to prevent possible harness damage.
- Remove regulator assembly from vehicle.
- Installation procedure is the reverse of removal.
- Set regulator to witness marks from previous installation.
- Align glass to seals.
READ NEXT:
 Seal - Body - Side - Front - Primary - LH (Remove and Replace)
Removal
Remove the 'B' post upper trim (refer to procedure).
Release the clips (x3) that secure the leading edge of the seal
to the body.
Caution: Take care
Seal - Body - Side - Rear - Primary - LH (Remove and Replace)
Removal
Remove 'B' post upper trim (refer to procedure)
Release clip (x1) securing rear door seal to body.
Carefully release seal from rocker panel and work toward upper
section o
Seal - Door - Front - A Pillar - Margin - LH (Remove and Replace)
Removal
Open vehicle door, ensuring good access.
Carefully release clip (x1) securing top of flap seal to door.
Caution: Take care not to damage component(s).
SEE MORE:
Wheel Arch Liner - Upper - Front - LH (Remove and Replace)
Warning: If the vehicle has air suspension, activate "Jack"
mode on the touchscreen before raising and supporting the vehicle.
Removal
Raise and support the vehicle (refer to procedure)
Warning: Do not work on an incorrectly supported
vehicle.
Recover Refrigerant and Verify Charge
Note: Before beginning this section,
complete the "Set Up HVAC Machine" section.
Connect a laptop with Toolbox to the vehicle.
Remove the rear underhood apron (refer to procedure).
Remove the dust caps from the vehicle's high-side and low-side
service ports.
© 2019-2026 Copyright www.tesms.org
