Tesla Model S: 4 Way Coolant Valve - Series/Parallel (Remove and Replace)
Warning: If the vehicle has air suspension, activate "Jack" mode on the touchscreen before raising and supporting the vehicle.
Warning: If the 12V power supply is disconnected, do not attempt to open any doors with door glass in closed position. Failure to follow this instruction could result in door glass shatter.
Note: Before disconnecting the 12V power supply, ensure that the driver's door window is fully open. Failure to follow this instruction could result in vehicle lockout.
Removal
- Raise and support the vehicle (refer to procedure).
- Disconnect 12V power.
- Rear wheel drive (RWD): Refer to procedure.
- Dual Motor: Refer to procedure.
- Remove the underhood storage unit for access (refer to procedure).
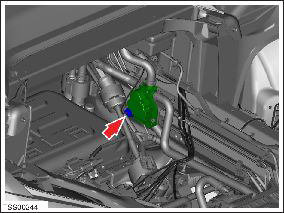
- Disconnect the coolant valve connector.
- Position a container to collect coolant.
- Clamp the feed and return coolant hoses (x4).
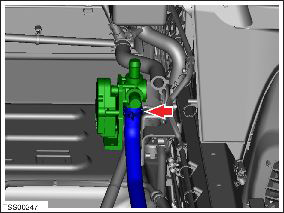
- Release the clips (x3) that secure the coolant hoses to the
coolant valve. Release the hoses from the valve.

- Remove the bolts (x2) that secure the coolant valve to the
bracket (torque 5 Nm).
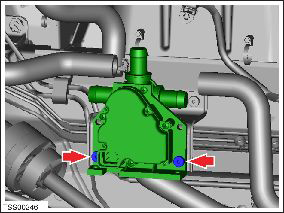
- Release the valve from the bracket for access to the remaining coolant pipe clip.
- Release the clip that secures the coolant hose to the valve.
Release the hose from the valve.
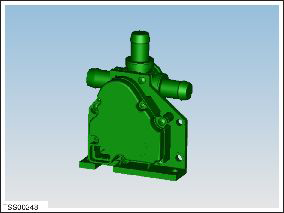
- Remove the coolant valve.
- Installation procedure is the reverse of removal, except for the following: Warning: Only use cleaning agents and solvents in a well-ventilated area. Note: Clean the affected areas before installation.
- Refill and bleed the cooling system (refer to procedure).
READ NEXT:
 Coolant Heater - Electric - Battery - 1st Generation (Remove and Replace)
Warning: Only technicians who have been trained in High
Voltage Awareness are permitted to perform this procedure. Proper
personal protective equipment (PPE) and insulating HV gloves with a
Coolant Heater - Electric - Battery - 2nd Generation (Remove and Replace)
Warning: Only technicians who have been trained in High
Voltage Awareness are permitted to perform this procedure. Proper
personal protective equipment (PPE) and insulating HV gloves with a
Coolant Heater - Electric - Battery (Dual Motor) (Remove and Replace)
Warning: Only technicians who have been trained in High
Voltage Awareness are permitted to perform this procedure. Proper
personal protective equipment (PPE) and insulating HV gloves with a
SEE MORE:
Reinstall Components
Installation of components is reverse of removal, except for the
following:
When reconnecting the HV cables to the charge port:
Remove any adhesive patch residue from the mating surfaces of
the high voltage cable lugs.
Remove any adhesive patch residue from the surfaces of the
TXV Valve - Evaporator (Remove and Replace)
Removal
Recover refrigerant from the vehicle (refer to procedure)
Remove underhood storage unit (refer to procedure)
Remove nut securing pipe retaining plate to evaporator TXV
(torque 22 Nm).
Remove bolt securing A/C pipe bracket to cross-brace (torque 6
Nm).
