Tesla Model S: Reinstall Components
Installation of components is reverse of removal, except for the following:
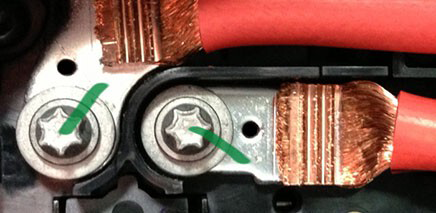
When reconnecting the HV cables to the charge port:
- Remove any adhesive patch residue from the mating surfaces of the high voltage cable lugs.
- Remove any adhesive patch residue from the surfaces of the
terminals.
- Push the pawl actuator tab to the left to release the pawl, then
insert the charge port alignment tool into the charge port.
Note: The charge port alignment tool should only be used on vehicles manufactured for North America and Japan. Vehicles manufactured for all other countries include the European charge port and do not require use of the charge port alignment tool during this procedure.
- Install the bolts (x2) that secure the HV cables to the charge port (torque 9 Nm). Caution: Do not use any washers other than the captive washers that are part of the new bolts.
- Place a paint mark on each bolt to indicate that it has been
properly tightened. Use one continuous motion to mark the bolt head,
washer, and the surface of the lug.
- Push the pawl actuator tab to the left to release the pawl, then remove the charge port alignment tool from the charge port if used.
- Reinstall the pawl actuator cover.
READ NEXT:
 Charge Port - 3 Phase - Manual Release of Cable
Note: This procedure describes how to manually release a
cable from the 3 phase charge port. If the vehicle is equipped with
a single phase charge port, refer to procedure 44013005 (refer to
Door - Charge Port - Non-Motorized (Remove and Replace)
Removal
Remove the LH tail light assembly (refer to procedure).
Remove the screws (x3) that secure the charge port door to the
tail light assembly.
Door - Charge Port - Single Phase - Motorized (Remove and Replace)
Note: The charge port door and motor are removed as an
assembly.
Removal
Remove the LH tail light assembly (refer to procedure).
Remove the screws (x3) that secure the charg
SEE MORE:
Cannot charge - Poor grid power quality possible
Retry / Try other charge location or Supercharging
Charging has stopped due to a condition that prevents your vehicle from
charging with AC power. DC fast charging /
Supercharging should still function as expected.
This condition could occur due to power supply disturbances caused by the
externa
Module - Air Suspension - ECU (RHD) (Remove and Install)
Warning: If the 12V power supply is disconnected, do
not attempt to open any doors with door glass in closed position.
Failure to follow this instruction could result in door glass
shatter.
Note: Before disconnecting the 12V power supply,
ensure that the driver's door window
© 2019-2026 Copyright www.tesms.org
