Tesla Model S: TXV Valve - Evaporator (Remove and Replace)
Tesla Model S (2012-2026) Service Manual / Thermal Management / TXV Valve - Evaporator (Remove and Replace)
Removal
- Recover refrigerant from the vehicle (refer to procedure)
- Remove underhood storage unit (refer to procedure)
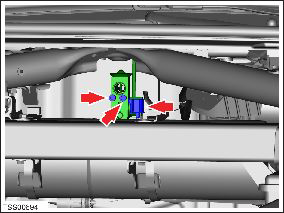
- Remove nut securing pipe retaining plate to evaporator TXV (torque 22 Nm).
- Remove bolt securing A/C pipe bracket to cross-brace (torque 6
Nm).

- Disconnect refrigerant pipes from TXV. Caution: Plug pipe connections to prevent ingress of moisture or dirt. Caution: Remove and discard O-rings.
- Disconnect TXV solenoid valve connector.
- Remove bolts (x2) securing TXV to evaporator (torque 6 Nm).
- Remove TXV from evaporator.
- Installation procedure is the reverse of removal, except for the following:
- Replace A/C pipe O-rings.
Caution: Lubricate new O-rings with clean refrigerant oil.
READ NEXT:
 TXV Valve - Chiller (Remove and Replace)
Removal
Recover refrigerant from the vehicle (refer to procedure).
Remove the front skid plate (refer to procedure).
Remove the nut that secures the pipe retaining plate to the TXV
Pressure Transducer - Low Pressure (Remove and Replace)
Removal
Recover refrigerant from the vehicle (refer to procedure).
Remove the underhood storage unit (refer to procedure).
Disconnect the electrical connector from the pressure
tr
Battery Chiller and TXV Assembly (Remove and Replace)
Warning: If the 12V power supply is disconnected, do
not attempt to open any doors with door glass in closed position.
Failure to follow this instruction could result in door glass
shat
SEE MORE:
About the Security System
If Model S does not detect a key nearby and a locked
door or trunk is opened, an alarm sounds. The
headlights and turn signals also flash. To deactivate the
alarm, press any button on the key fob.
To manually enable or disable the alarm system, touch
Controls > Safety > Security Alarm. Wh
Handle - Exterior Release - Door - Front - LH (Remove and Replace)
Removal
Remove regulator assembly (refer to procedure)
Make sure exterior release handle is fully retracted.
Disconnect handle harness connector.
Remove nuts (x4) securing door release assembly to reinforcement
(torque 9 Nm).
Carefully release door handle assembly from d
© 2019-2026 Copyright www.tesms.org
