Tesla Model S: 'B' Post Trim Panel - LH (Remove and Replace)
Tesla Model S (2012-2026) Service Manual / Exterior fittings / 'B' Post Trim Panel - LH (Remove and Replace)
Removal
- Open both LH doors.
- Remove clips (x2) securing 'B' post finisher to body. Caution: Protect exterior paint surfaces during this procedure. Note: Components have been removed in this graphic to aid clarity.
- Using a trim knife release lower edge of finisher and remove screw cover.
- Remove screws (x2) securing lower end of trim to 'B' post (torque 4 Nm).
- Using trim knife cut adhesive bonding securing trim to 'B' post
- Using a suitable tool release clips (x2) from top end of
finisher.
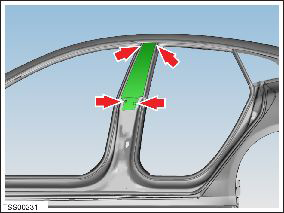
- Release and remove finisher.

- Remove remaining adhesive from 'B' post.
Caution: Protect exterior paint surfaces during this procedure.
Installation- Installation procedure is the reverse of removal, except for the following: Note: Clean the affected areas before installation.
- Replace any damaged clips.
- Apply two runs of suitable sealant to inner surface of trim.
- Install and align trim, clean any excess sealant from 'B' post.
READ NEXT:
 Brightwork - Body side - LH (Remove and Replace)
Removal
Release the top of the front and rear door seals.
Note: Components have been removed in this graphic
to aid clarity.
Note: The following image shows th
Rocker Panel - LH (Remove and Replace)
Removal
Remove the plastic rivets (x2) that secure the trailing edge of
the front wheel arch liner to the rocker panel finisher.
Pad - Lifting - Each (Remove and Replace)
Removal
If the vehicle is equipped with air suspension, set the
suspension to "High" or "Very High".
Tip: If necessary, this procedure can be performed with the
SEE MORE:
Bleed Procedure - One Caliper (Remove and Replace)
Warning:
If the 12V power supply is disconnected, do not attempt to open
any doors with door glass in closed position. Failure to follow
this instruction could result in door glass shatter.
Note: Before
disconnecting the 12V power supply, ensure that the driver's
door w
Handle and Cable Assembly - 40A Wall Connector (Remove and Replace)
Note: This procedure describes how to remove and replace
the 40A Wall Connector handle and cable assembly. For instructions
on how to remove and replace the 80A Wall Connector handle and cable
assembly, refer to procedure 50022002 (refer to procedure).
Removal
Warning
© 2019-2026 Copyright www.tesms.org
