Tesla Model S: Brightwork - Body side - LH (Remove and Replace)
Tesla Model S (2012-2026) Service Manual / Exterior fittings / Brightwork - Body side - LH (Remove and Replace)
Removal
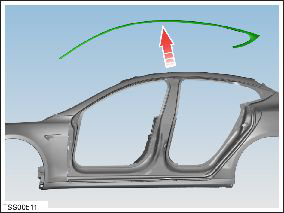
- Release the top of the front and rear door seals.
Note: Components have been removed in this graphic to aid clarity.
Note: The following image shows the rear door seal.
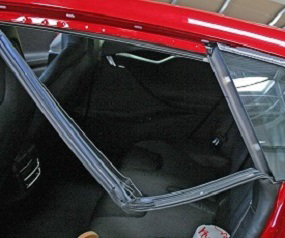
- Remove the screws (x12) that secure the body side brightwork
(torque 3 Nm).
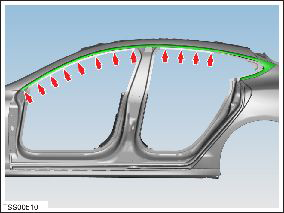
- Carefully release the body side brightwork from the adhesive pads surrounding the rear quarter glass.
- Release and remove the brightwork.
Caution: Take care not to damage component(s).
Installation procedure is the reverse of removal, except for the following:
- Replace all plastic clips that were removed when releasing the door seals.
- Wipe the body side and brightwork with alcohol to remove adhesive residue. Warning: Only use cleaning agents and solvents in a well-ventilated area.
- Replace the adhesive pads (x3).
- Remove the adhesive pad protective film.
- Align the brightwork to the bodyside and adjust to obtain the best possible fit. Caution: Protect exterior paint surfaces during this procedure.
- Loosely tighten the forward most screw to support the front of the body side brightwork.
- Tighten the screws (x12) starting with the rear screw and moving forward.
READ NEXT:
 Rocker Panel - LH (Remove and Replace)
Removal
Remove the plastic rivets (x2) that secure the trailing edge of
the front wheel arch liner to the rocker panel finisher.
Pad - Lifting - Each (Remove and Replace)
Removal
If the vehicle is equipped with air suspension, set the
suspension to "High" or "Very High".
Tip: If necessary, this procedure can be performed with the
Panel - Cowl Screen (Remove and Replace)
Removal
Remove the wiper arms (refer to procedure).
Remove the particulate filter (refer to procedure).
Remove the plastic rivets (x4 or x6) that secure the cowl to the
body.
SEE MORE:
Motor - Active Louver - Front Fascia (Remove and Replace)
Removal
Remove front fascia active louver vent (refer to procedure)
Remove screws (x3) securing louver drive motor to vent assembly
(torque 1 Nm).
Remove louver drive motor.
Note: Clean the affected
Charging slowed - Some AC phases not powered
Check power source and charging equipment
Charging speed has been reduced due to a condition that affects your
vehicle's ability to charge with AC power. DC
fast charging / Supercharging should still function as expected.
Your vehicle's onboard charger has detected that one or more power converte
© 2019-2026 Copyright www.tesms.org
