
Tesla Model S: Pad - Lifting - Each (Remove and Replace)
Tesla Model S (2012-2026) Service Manual / Exterior fittings / Pad - Lifting - Each (Remove and Replace)
Removal
- If the vehicle is equipped with air suspension, set the suspension to "High" or "Very High". Tip: If necessary, this procedure can be performed with the vehicle on a 4 post lift (refer to procedure).
- Remove the plastic rivets (x2) that secure the lifting pad to the body.
- Remove the screw that secures the lifting pad to the body
(torque 10 Nm).
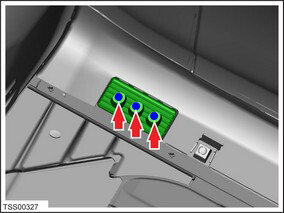
- Remove the lifting pad from the vehicle.
Installation procedure is the reverse of removal.
READ NEXT:
 Panel - Cowl Screen (Remove and Replace)
Removal
Remove the wiper arms (refer to procedure).
Remove the particulate filter (refer to procedure).
Remove the plastic rivets (x4 or x6) that secure the cowl to the
body.
Assembly - Underhood Apron - Front (Remove and Replace)
Removal
Remove the LH underhood apron (refer to procedure).
Remove the RH underhood apron.
Remove the retainers (x2) that secure the underhood apron.
Carefully release the clips (
Underhood Apron - Center - Rear (Remove and Replace)
Removal
Remove the LH underhood apron (refer to procedure).
Remove the RH underhood apron.
Release the clips (x5) that secure the rear center underhood
apron to the plenum.
SEE MORE:
AC Refrigerant Leak Detection
Recover refrigerant from the vehicle (refer to procedure), see section "Recover
Refrigerant and Verify Charge").
Remove the underhood storage unit(refer to procedure).
Release the bolt that secures the HVAC compressor discharge line (torque
10 Nm).
Key Card
Tesla provides you with two Model S key cards, designed
to fit in your wallet.
To use a key card to unlock or lock Model S, position the
card as shown and tap it against the card reader located
approximately one third the way up of the driver's side
door pillar. When Model S detects the key car
© 2019-2026 Copyright www.tesms.org
