Tesla Model S: Rocker Panel - LH (Remove and Replace)
Tesla Model S (2012-2026) Service Manual / Exterior fittings / Rocker Panel - LH (Remove and Replace)
Removal
- Remove the plastic rivets (x2) that secure the trailing edge of
the front wheel arch liner to the rocker panel finisher.
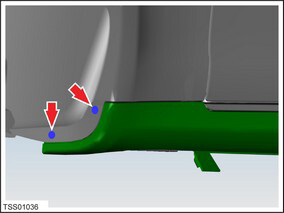
- Remove the plastic rivets (x4) that secure the leading edge of
the rear wheel arch liner to the rocker panel finisher.
- Carefully release the rocker panel bright trim from the vehicle by releasing the clips that secure it to the body. Caution: Replace any broken clips.
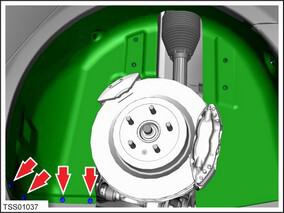
- Remove the screws (x12) that secure the rocker panel finisher to
the body (torque 1.5 Nm).
Caution: Take care not to damage component(s).
Caution: Protect paintwork from possible damage during this procedure.
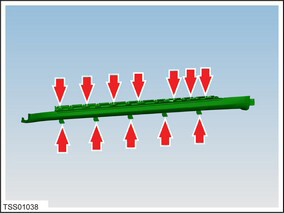
- Remove the rocker panel from the vehicle.
Installation procedure is the reverse of removal.
READ NEXT:
 Pad - Lifting - Each (Remove and Replace)
Removal
If the vehicle is equipped with air suspension, set the
suspension to "High" or "Very High".
Tip: If necessary, this procedure can be performed with the
Panel - Cowl Screen (Remove and Replace)
Removal
Remove the wiper arms (refer to procedure).
Remove the particulate filter (refer to procedure).
Remove the plastic rivets (x4 or x6) that secure the cowl to the
body.
Assembly - Underhood Apron - Front (Remove and Replace)
Removal
Remove the LH underhood apron (refer to procedure).
Remove the RH underhood apron.
Remove the retainers (x2) that secure the underhood apron.
Carefully release the clips (
SEE MORE:
Hardware
RST-324
Tesla part number:
1024264-00-A
Description:
Wheel Lock Keys for Tooling, MDLS
Model:
Model S
Status:
Distribution
Seal - Body - Side - Front - Primary - LH (Remove and Replace)
Removal
Remove the 'B' post upper trim (refer to procedure).
Release the clips (x3) that secure the leading edge of the seal
to the body.
Caution: Take care not to damage component(s).
Caution: Protect exterior paint surfaces during this
pro
© 2019-2026 Copyright www.tesms.org
