Tesla Model S: AC Refrigerant Leak Detection
Tesla Model S (2012-2026) Service Manual / Thermal Management / AC Refrigerant Leak Detection
- Recover refrigerant from the vehicle (refer to procedure), see section "Recover Refrigerant and Verify Charge").
- Remove the underhood storage unit(refer to procedure).
- Release the bolt that secures the HVAC compressor discharge line (torque
10 Nm).
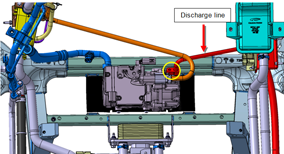
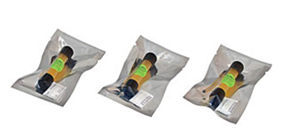
- Pour 1 container of Tracerline Tracer-Stick TP-3811 Hybrid / POE
ultraviolet leak detection dye (Figure 7) into the A/C compressor discharge
port and resecure the bolt (torque 10 Nm).
- Recharge the vehicle with refrigerant (refer to procedure, see section "Recharge Refrigerant").
- On the vehicle's touchscreen, touch Climate. Set Temp to LO and Fan to HI on both the driver and passenger controls.
- Run the A/C system for 10 minutes to allow the dye to circulate.
- Using an ultraviolet (UV) or blue light lamp, examine all AC lines for leaks. Leaks glow a bright yellow-green.
- Once the leak is located, recover refrigerant from the vehicle (refer to procedure, see section "Recover Refrigerant and Verify Charge").
- Replace the defective component.
- Recharge the vehicle with refrigerant (refer to procedure, see section "Recharge Refrigerant"). Note: If a component was replaced, additional oil must be added to the system. See the end of the "Recover Refrigerant and Verify Charge" section for more information.
- Use a general-purpose shop cleaner to clean off all dye residue. This prevents leftover residue from being mistake for a leak in future repairs. Confirm that all residue is removed by inspecting all AC lines with a UV or blue light lamp
- Run the A/C system with the temp on LO and the fan on HI. Inspect all AC lines with a UV lamp or blue light to verify repairs.
- Fill out the Tracerline dye label and place it next to the A/C refrigerant label on the right underhood apron to inform future technicians that dye has been added to the A/C system.
READ NEXT:
 Condenser - Gas Cool (Remove and Replace)
Removal
Recover refrigerant from the vehicle (refer to procedure)
Remove front aero shield panel (refer to procedure)
Remove front LH wheel arch liner (refer to procedure)
Remove
Condenser - Sub-cool (Remove and Replace)
Removal
Recover refrigerant from the vehicle (refer to procedure)
Remove front aero shield panel (refer to procedure)
Remove front RH wheel arch liner (refer to procedure)
Remove
Fan - Condenser - LH (Remove and Replace)
Removal
Recover refrigerant from the vehicle (refer to procedure).
Remove the front wheel arch liner (refer to procedure).
Remove the bolts (x2) and remove the front bumper support ba
SEE MORE:
Pipe - High Pressure - Compressor to Condenser (Dual Motor) (Remove and
Replace)
Removal
Position the vehicle on a lift, but do not raise it at this
time.
Recover refrigerant from the vehicle (refer to procedure).
Remove the 12V battery (refer to procedure).
Remove the bolt that secures the high pressure pipe to the
compressor (torque 10 Nm).
Bracket - License Plate - Front (Retrofit)
Special tool required for this procedure:
Supplier
Part Number
Description
Tesla
223-28550-TSL
WIHA (TORQUE SCREWDRIVER .1 -
.6NM)
Procedure
© 2019-2026 Copyright www.tesms.org
